Häufig Fragen zu unseren Lösungen & Services
Auf unserer FAQ-Seite haben wir die häufigsten Fragen rund um unsere Lösungen und Services für Sie zusammengefasst. Sie brauchen Hilfe zu einem anderen Thema? Dann hilft Ihnen unser Support gerne weiter oder kontaktieren Sie uns direkt über den Website-Chat.
Benutzeroberfläche
1. Validieren, Freigeben, Publizieren – Was bedeuten diese verschiedenen Schritte?

Die Funktion Validieren ist optional. Sie prüft die Daten bzgl. des aktuellen Standards. Hilfreich ist die Funktion für die Artikelliste. Sie ermöglicht es, bis zu 100 Artikel mit einem Knopfdruck zu prüfen, ohne jeden einzelnen öffnen zu müssen (siehe Tipps & Tricks). Innerhalb des Editors ist die Funktion auch gegeben, aber die Datenprüfung ist hier proaktiv und wird zusätzlich mit der Funktion “Speichern” oder “Freigeben” ebenfalls gestartet.
Indem Sie die Funktion Freigeben betätigen, senden Sie die Daten auf unseren Server (Datenpool). Das bedeutet, dass die Daten dann prinzipiell bereitstehen und Empfängern zur Verfügung gestellt werden können. Bitte geben Sie neu angelegte Hierarchien immer nur (!!) von der höchsten Hierarchiestufe aus frei. Sind im Nachgang Korrekturen fällig, geben Sie den Artikel frei, den Sie korrigiert haben.
Durch die Publikation bestimmen Sie dann, für wen Sie die Daten bereitstellen. Wenn Sie auf „Publizieren“ klicken, öffnet sich ein Fenster, in dem Sie auswählen müssen, für wen die Daten bestimmt sind – für den “Zielmarkt” (Daten werden öffentlich innerhalb des GDSN-Netzwerks bereitgestellt) oder nur für einzelne Empfänger? Treffen Sie bitte die richtige Auswahl und publizieren Sie die Daten. Die Empfänger senden Ihnen bei Eingang der Daten eine Nachricht, die Sie unter “Empfänger-Rückmeldungen (CICs)” einsehen können. Publizieren Sie stets nur die höchste Hierarchie-Einheit. Nach einer Aktualisierung muss ein Artikel nicht erneut publiziert, sondern nur erneut freigegeben werden.
2. Kann ich gezielt nach Attributen suchen?
Ja, über den Attributfinder in der Menüliste.
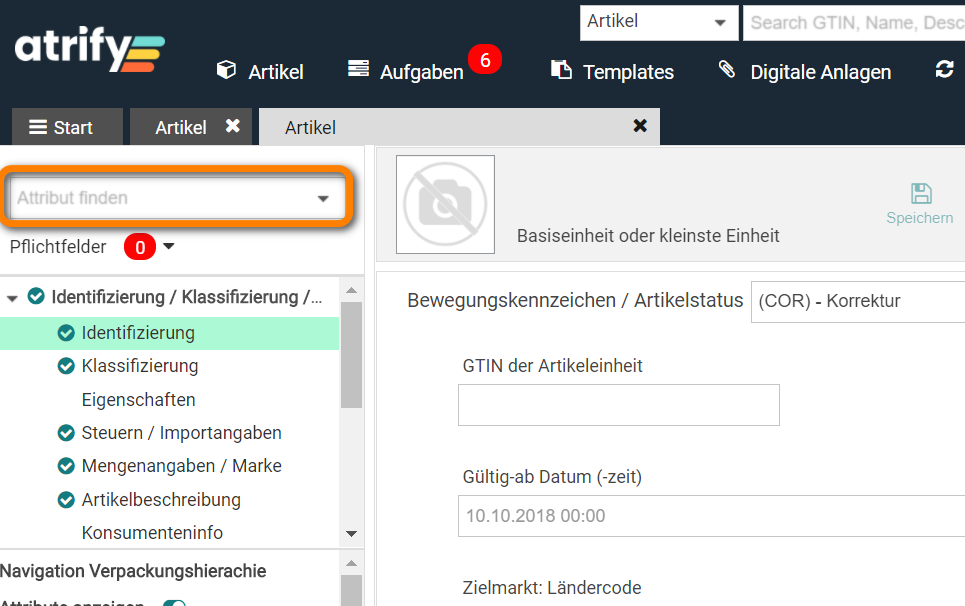
Wenn Sie den Namen von dem gesuchten Attribut kennen, können Sie diesen einfach in das Feld eintippen.
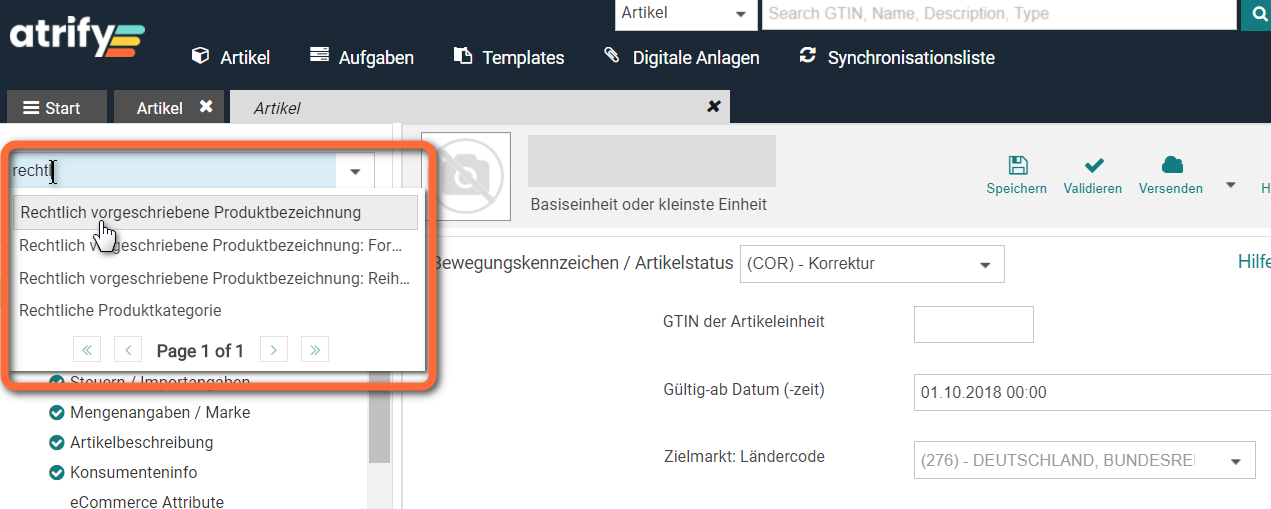
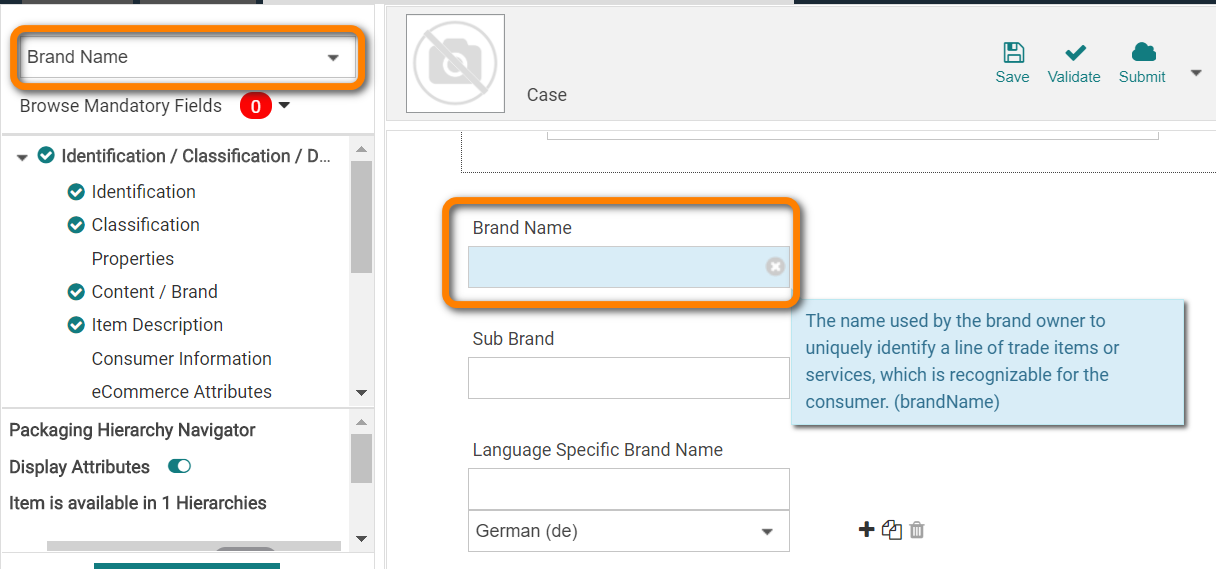
Klicken Sie im Drop-Down auf das Attribut und Sie gelangen automatisch zu dem gesuchten Feld im Publishing. Dieses ist zusätzlich farblich hinterlegt.
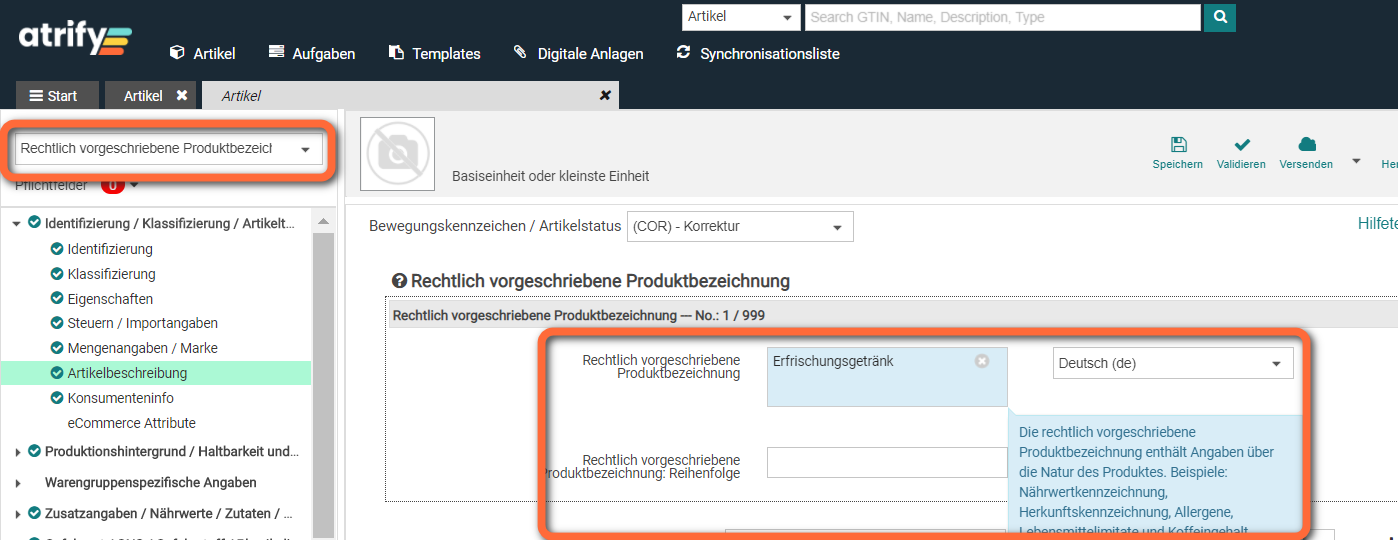
Bitte beachten Sie, dass die Suche nur einzelne Attribute findet, jedoch keine Attribute in Attributgruppen. Hier kann nur die Gruppenbezeichnung gefunden werden und nur die Attributgruppe wird geöffnet.
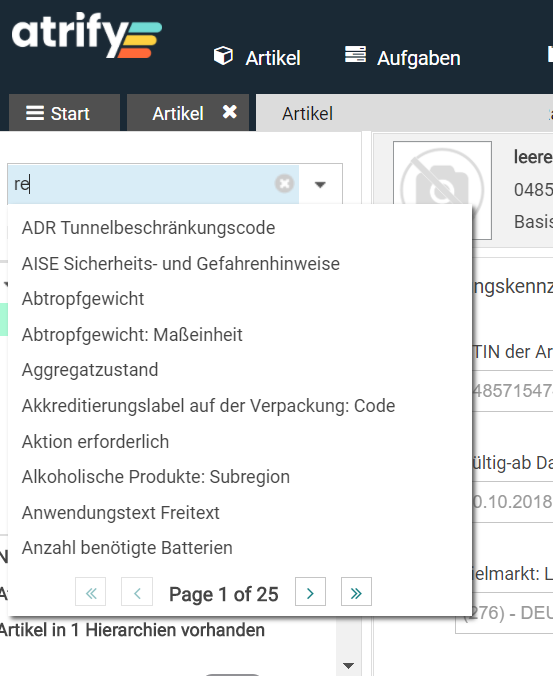
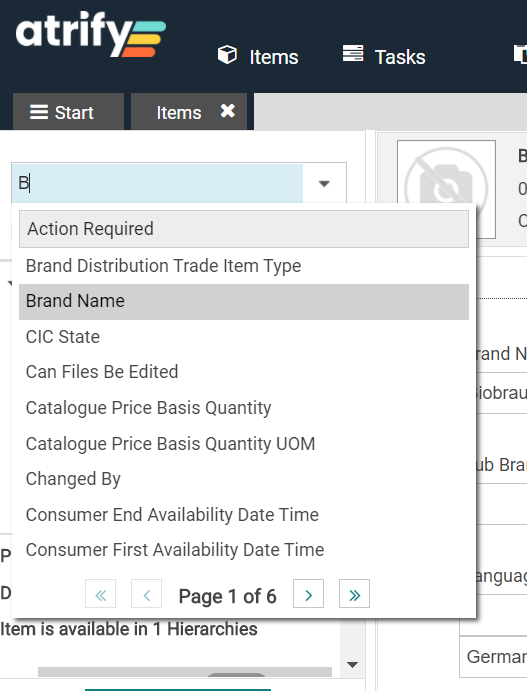
Über das Drop-down-Menü können Sie alternativ auch ein Attribut aus der Liste wählen.
3. Kann ich die Tabellenansicht in der Artikelübersicht ändern?
Ja, das Layout der Tabellenspalten in Ihrer Artikelübersicht lässt sich bearbeiten. Es gibt zunächst die Möglichkeit zwischen zwei Trefferlistenmodi umzuschalten:
- “Einfache Ansicht” – Standardmodus, der eine sehr einfache Ansicht der Elemente bietet
- “Erweiterte Ansicht” – Expertenansicht, die vollständig konfigurierbar ist
Wählen Sie in der Dropdown-Liste „Tabellenansicht“ einfach die bevorzugte Ansicht aus.

Bei der Erweiterten Ansicht können die Tabellenspalten mit der Funktion „Ansicht bearbeiten“ individuell angepasst werden. Sollte Sie beispielsweise die Spalte „Datei: Thumbnail“ mit den Produktabbildungen stören, können Sie die Spalte einfach verschieben oder gar entfernen.
1) Gehen Sie dafür in Ihre Artikelübersicht und klicken Sie auf „Ansicht bearbeiten“. Es öffnet sich ein neues Fenster in dem alle verfügbaren Tabellenspalten aufgelistet sind.
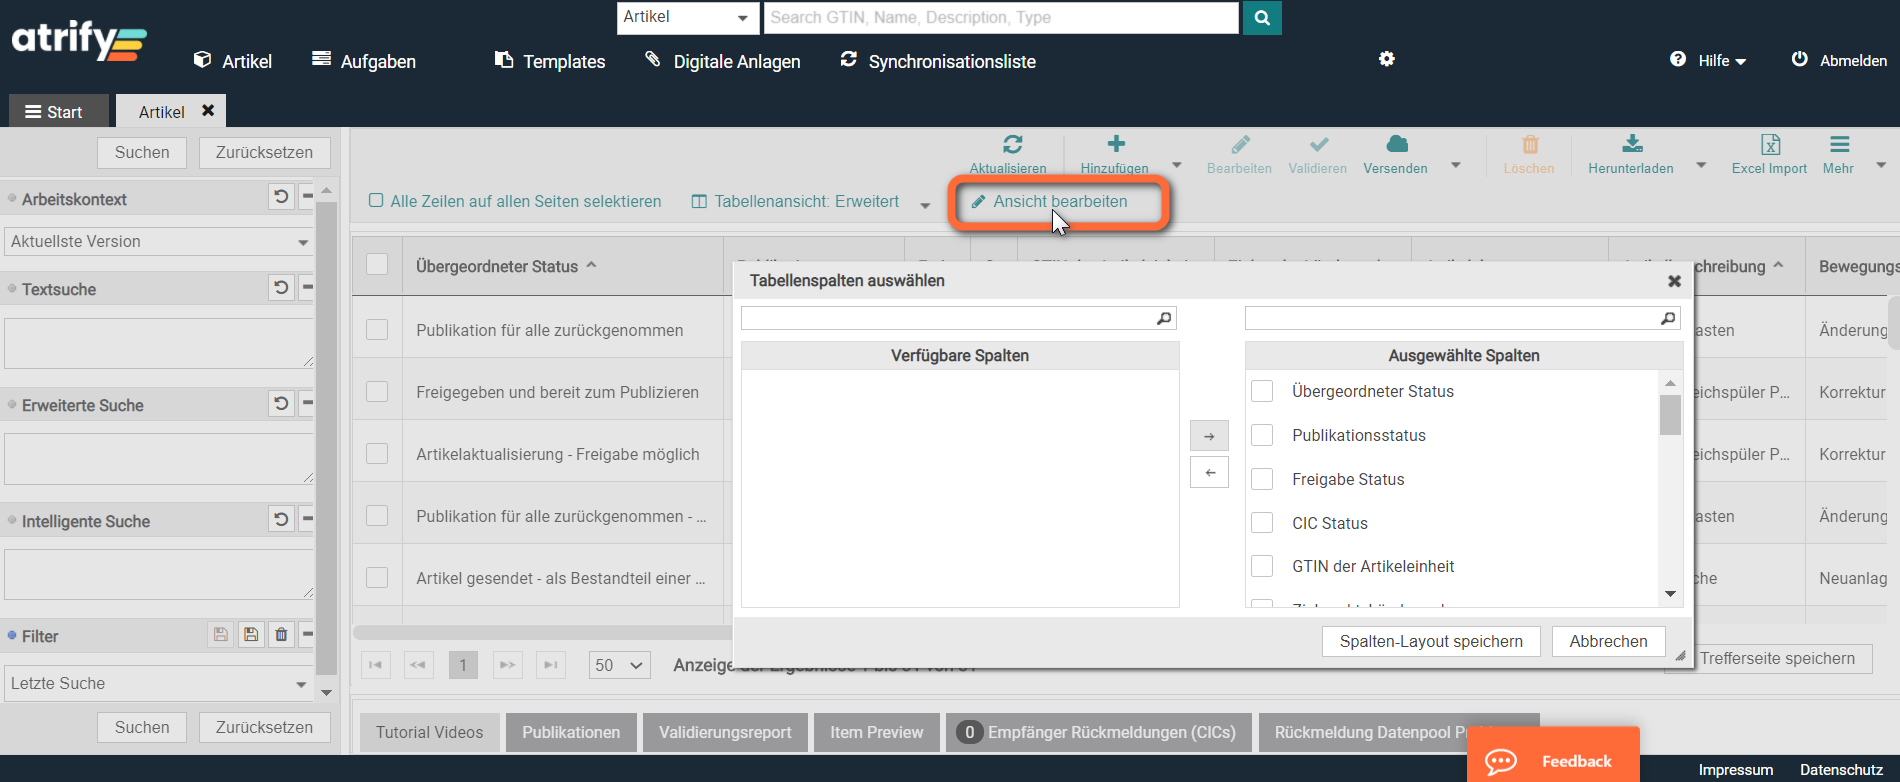
2) In diesem Fenster können Sie nun die Spalten der Tabelle beliebig bearbeiten.
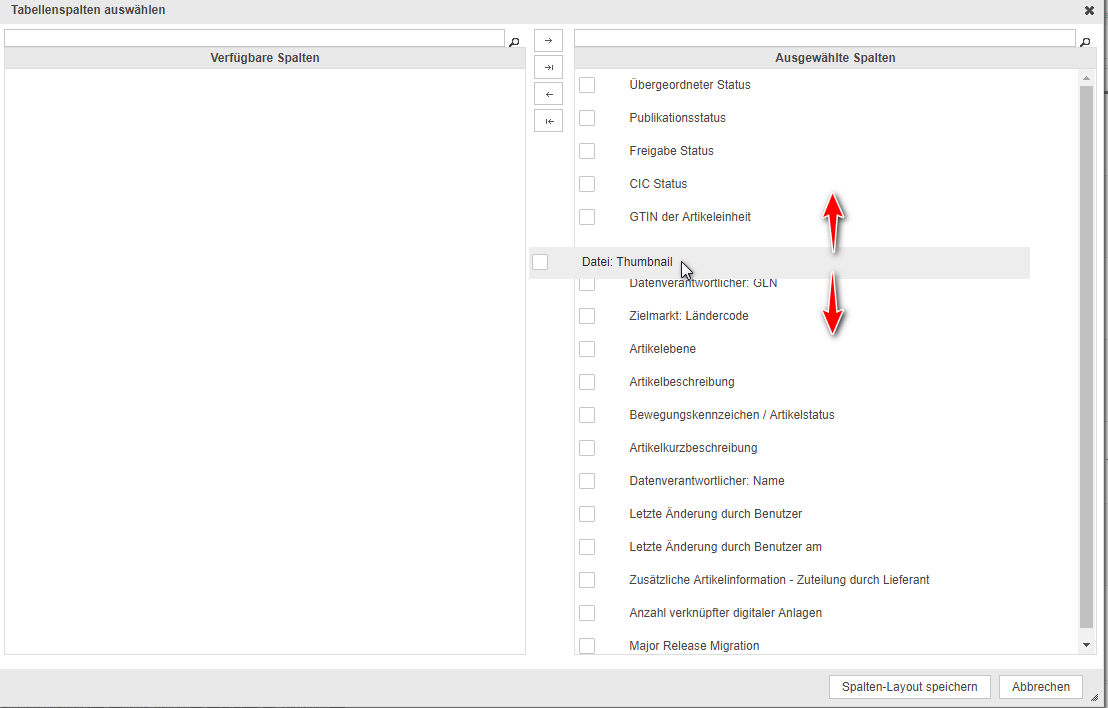
a) Sie können die Reihenfolge der Spalten verändern indem Sie die Spalte anklicken und einfach mit der Maus an die gewünschte Stelle ziehen.
b) Sie können Spalten entfernen, indem Sie diese auswählen und auf „remove“ klicken. Die ausgewählte Spalte wird dann in den Bereich „Verfügbare Spalten“ verschoben und ist nicht mehr in der Tabellenansicht vorhanden.
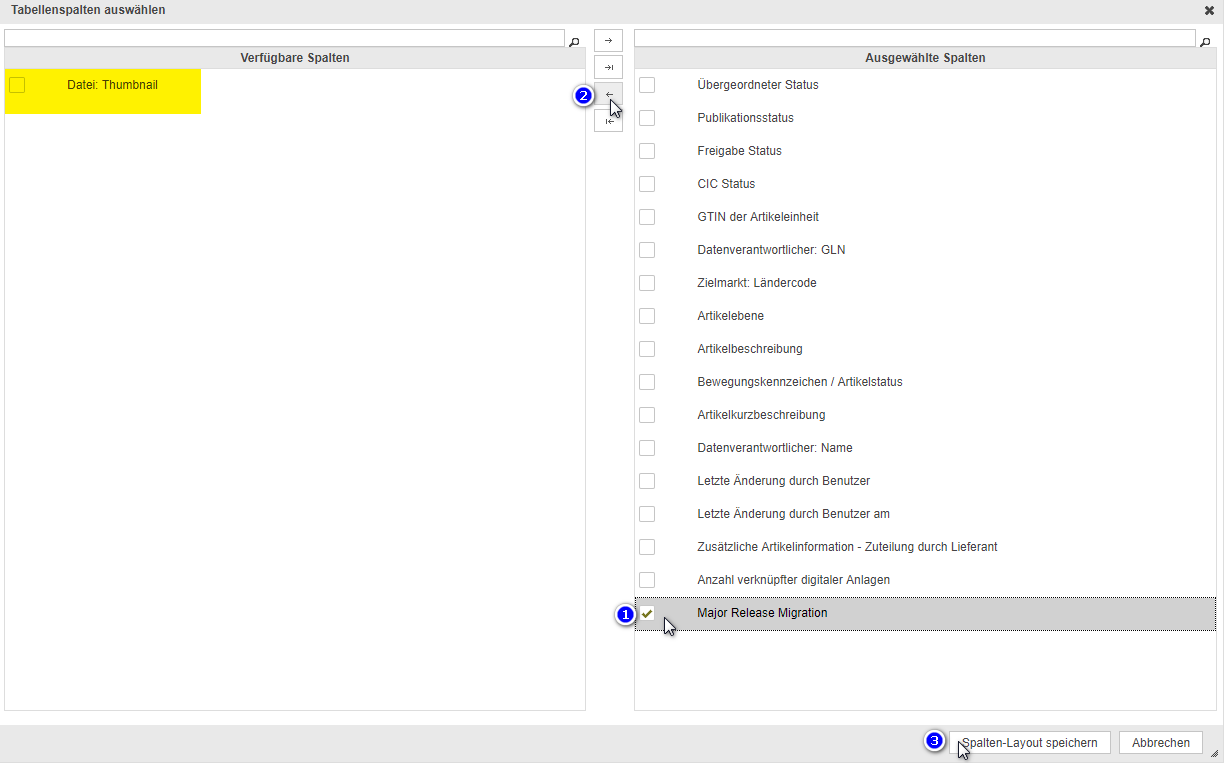
Wenn Sie mit der Bearbeitung fertig sind, klicken Sie auf „Spalten-Layout speichern“ und das Fenster schließt sich. Die Tabellenspalten wurden nun nach Ihren Vorstellungen angepasst.
4. Wie kann ich meine Artikel filtern?
In Ihrer Artikelübersicht finden Sie im linken Bereich verschiedene Such- und Filterkriterien, mit denen Sie die angezeigten Artikel eingrenzen können.
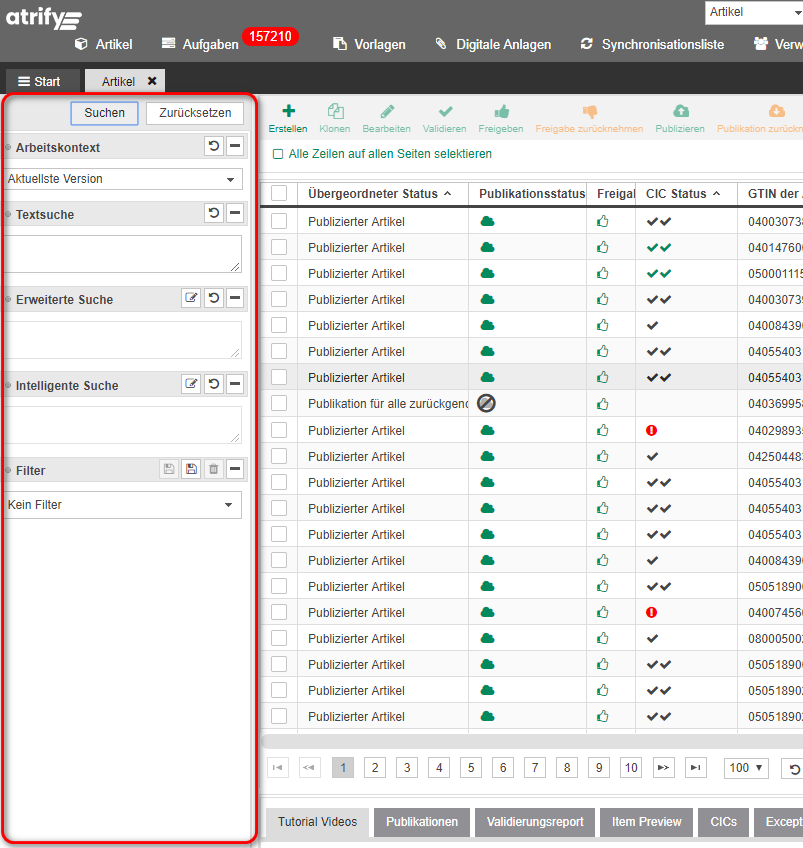
Mit dem Arbeitskontext können Sie ihre Artikel auf einen bestimmten Status beschränken:
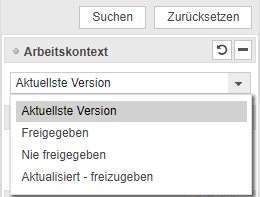
In die Textsuche können Sie einen oder mehrere Suchbegriffe eingeben wie z.B. GTIN’s (bis zu 900 gleichzeitig) oder Stichwörter. Indem Sie dann auf „suchen“ klicken wird Ihre Trefferliste auf die entsprechenden Artikel begrenzt.

Generell lässt sich die Textsuche durch die Verwendung von Platzhaltern und logischen Operatoren z.B. [], *, [*], [+] eingrenzen.
Mit der Erweiterten Suche können Sie Ihre Artikel nach bestimmten Attributen wie z.B. Zielmarkt Ländercode, Basisartikel, Auslaufdatum etc. filtern. Um diese Filter nutzen zu können, klicken Sie auf das Symbol Bearbeiten. Es öffnet sich ein neues Fenster, in dem Sie die Suchkriterien definieren können.
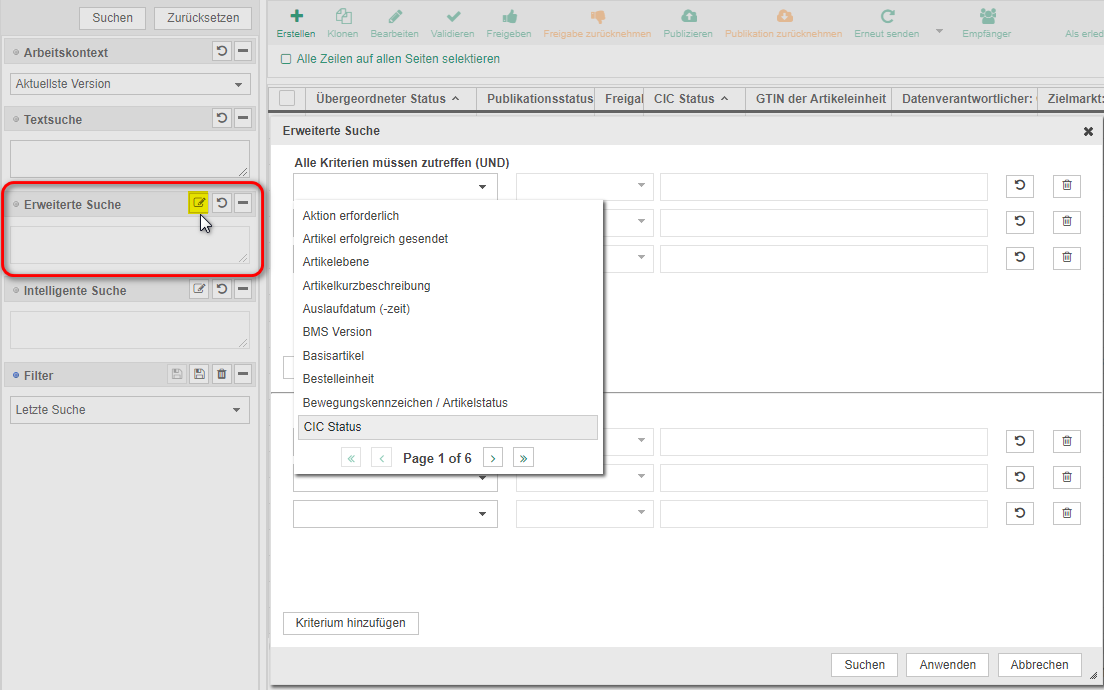
Sobald Sie mit der Definition der Suchkriterien fertig sind, klicken Sie entweder auf Suchen (und die Suche wird direkt durchgeführt) oder auf Anwenden (die Suchkriterien werden übernommen aber die Suche wird noch nicht durchgeführt).
Mit der Intelligenten Suche können Sie Ihre Artikel nach bestimmten Eigenschaften wie z.B. in Bezug auf den Publikationsstatus, die GPC-Klassifizierung, den CIC-Status etc. filtern. Um diese Filter nutzen zu können, klicken Sie auf das Symbol Bearbeiten. Es öffnet sich ein neues Fenster, in dem Sie die Suchkriterien definieren können.
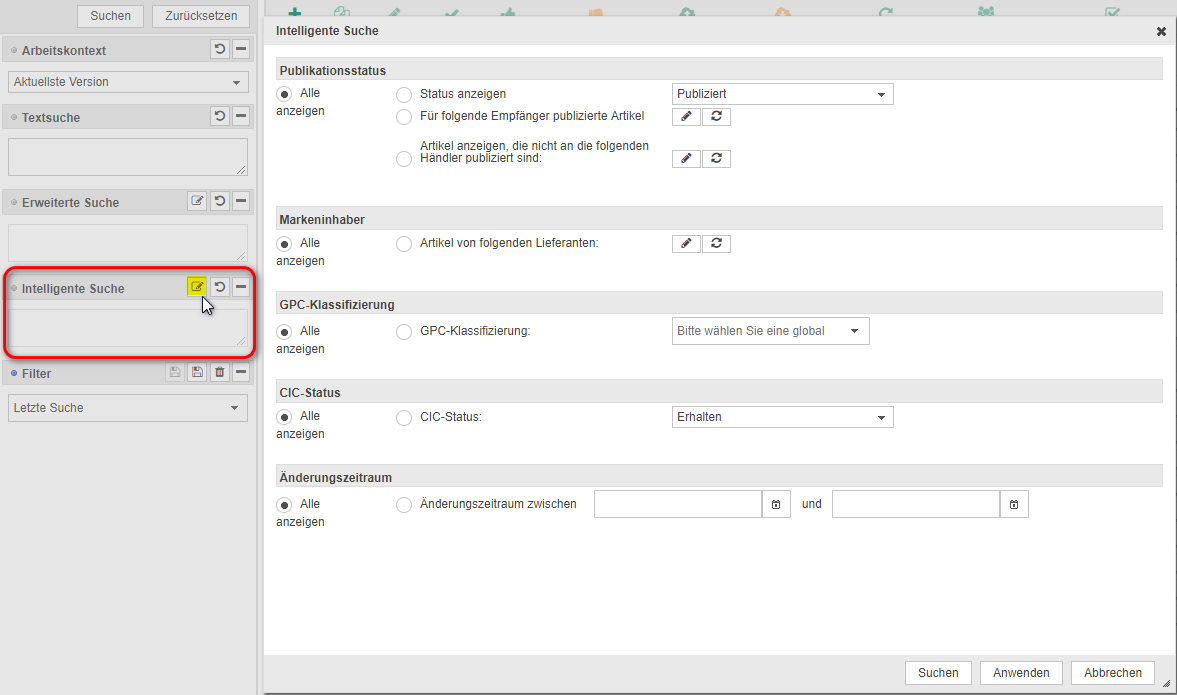
Sobald Sie mit der Definition der Suchkriterien fertig sind, klicken Sie entweder auf Suchen (und die Suche wird direkt durchgeführt) oder auf Anwenden (die Suchkriterien werden übernommen aber die Suche wird noch nicht durchgeführt).
Generell können alle Filter miteinander kombiniert werden, aber die Kombination muss sinnvoll sein und die Kriterien dürfen sich nicht gegenseitig ausschließen.
Es besteht außerdem die Möglichkeit die Sucheinstellungen zu speichern. Gehen Sie dafür folgendermaßen vor:
- Definieren Sie die gewünschten Sucheinstellungen
- Klicken Sie im Bereich Filter auf das Speichern Symbol

- Geben Sie in dem neuen Dialogfenster einen Namen für das Filterprofil ein und klicken Sie auf Speichern
Mehr Details zu den verschiedenen Filtern finden Sie in unserem atrify publishing Handbuch im Kapitel „Auswahl und Komponentensuche“. Das Handbuch finden Sie in unserem Download Center.
5. Wo kann ich mein Passwort ändern?
Wenn Sie angemeldet sind, klicken Sie bitte rechts oben auf Ihren Benutzernamen und wählen dann “Passwort ändern”:
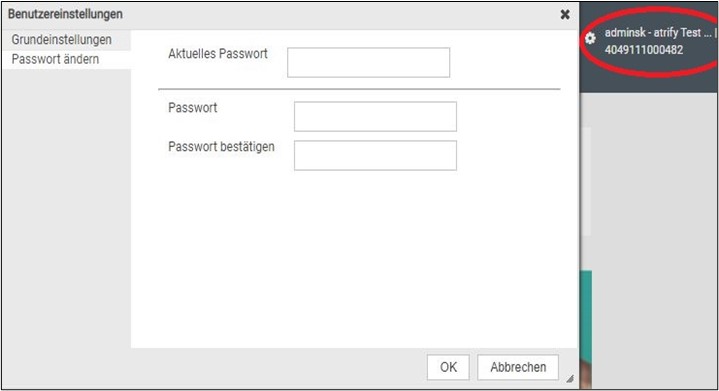
Das aktuelle Passwort ist jenes, mit dem Sie sich angemeldet haben. Wenn Sie das Passwort ändern, benötigen Sie dieses erst bei einer neuen Anmeldung. Die aktuelle Sitzung bleibt erst einmal bestehen.
Bitte beachten Sie, dass das Passwort mind. 5 Zeichen lang sein, Groß- und Kleinbuchstaben sowie Zahlen enthalten muss und darf keine Kombination des Benutzernamens oder Namens des Benutzers sein.
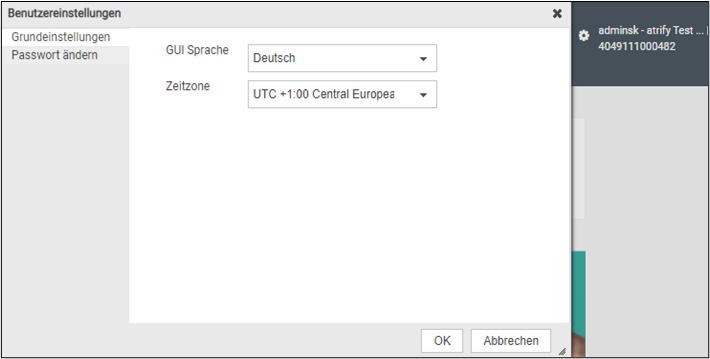
Um die Sprache und/oder Zeitzone zu ändern, wählen Sie bitte die “Grundeinstellungen”:
6. Wie kann ich zusätzliche Benutzer erstellen?
Bitte kontaktieren Sie das 1WorldSync GmbH Access Management: servicedesk@1worldsync.atlassian.net
Zur Erstellung zusätzlicher Benutzer wird lediglich Ihre GLN und/oder Ihr Firmenname, der Name des Benutzers und die E-Mail Adresse benötigt.
Sie können selbstverständlich auch Admin Rechte erhalten, um die Benutzer unter Ihrer GLN selbst zu verwalten. Zögern Sie nicht, danach zu fragen.
7. Wie kann ich einen Bericht erstellen?
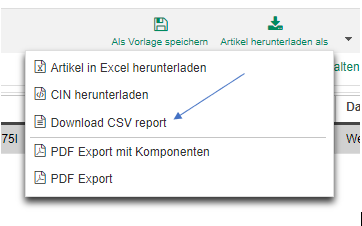
Klicken Sie dann auf „Neuen Report erstellen“.

Nun müssen Sie die Attribute in die Suchzeile eintragen, die im Bericht zu sehen sein sollen. Vergessen Sie bitte nicht, dass Sie Attribute wie „GTIN der Artikeleinheit“ oder „Interne Lieferantenartikelnummer“ aktiv auswählen müssen, damit sie in der Übersicht auftauchen. Markieren Sie das gewünschte Attribut und ziehen Sie es mit der Maus nach rechts zu „Ausgewählte Spalten“. Beachten Sie, dass Sie in der rechten Spalte auch noch die Möglichkeit haben, die Reihenfolge der Attribute zu ändern.
Tragen Sie in der obersten Zeile den Namen der Übersicht ein.
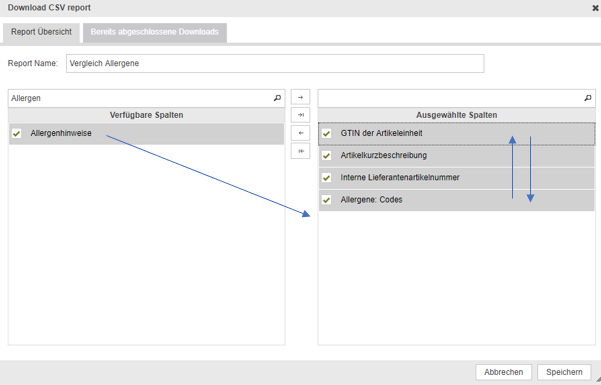
Klicken Sie auf „Speichern“. Nun können Sie den Bericht über das Download-Symbol herunterladen.

Bitte beachten Sie, dass der Bericht im CSV-Format erscheint. Sie müssen das Format i.d.R. nachbearbeiten, um den Bericht übersichtlich und nutzerfreundlich zu gestalten. Informieren Sie sich sich also, wie Sie die Datei am besten für Ihr bevorzugtes Dateiformat (z.B. Excel) einstellen können. Haben Sie bitte Verständnis dafür, dass dies nicht unter die Leistungen unseres Supports fällt.
Fehlermanagement
1. Orangefarbene Punkte. Was bedeuten sie?

Weitere Informationen zum DQG-Projekt finden Sie unter folgendem Link: https://www.gs1-germany.de/gs1-solutions/stammdaten/data-quality-gate/
2. Warum wird die GTIN nicht angenommen?
- Nur 14-stellige GTINs werden vom System angenommen
- Falls Ihre GTIN 13-stellig ist, geben Sie vor der ersten Ziffer eine Null ein
- Falls Ihre GTIN aus weniger als 13 Ziffern besteht, geben Sie vor der ersten Ziffer so viele Nullen ein, bis die 14 Ziffern erreicht sind, siehe Beispiel:
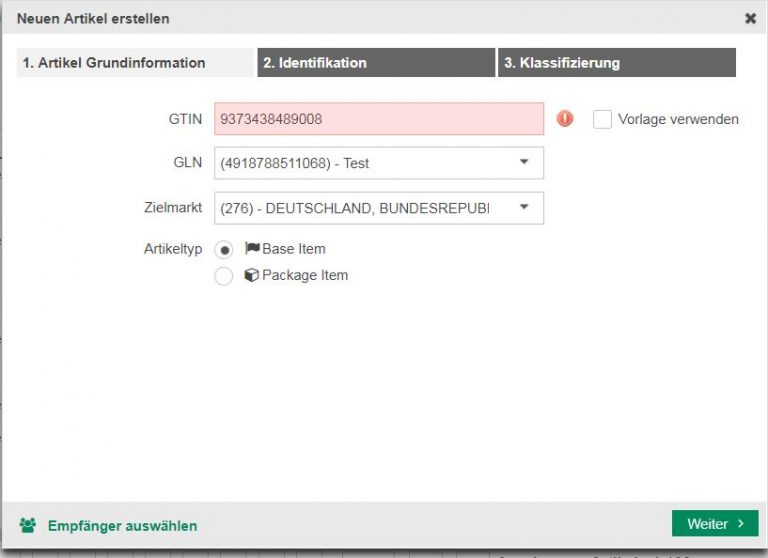
- Die GTIN 9373438489008 muss also durch die GTIN 09373438489008 ersetzt werden.
- Eventuell wurde die Prüfziffer (letzte Stelle der GTIN) nicht korrekt berechnet. Sie können diese ganz einfach mit dem Prüfziffernrechner überprüfen oder berechnen lassen: https://www.gs1-germany.de/serviceverzeichnis/pruefziffernrechner/
3. Was bedeutet die Fehlermeldung “keine Bestelleinheit”?
Voraussetzungen:
- Die Publikation sollte immer aus dem höchsten Niveau der Hierarchie durchgeführt werden; Z.B in dieser Hierarchie:
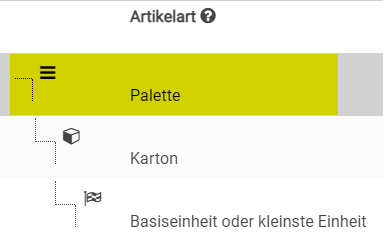
Publiziert man nur die Palette als höchste Hierarchieebene. Die Palette wird mit Status “publiziert” angezeigt; alle Komponenten, die sich in der Hierarchie befinden, werden mit Status “gesendet” angezeigt.
- In jeder Hierarchie muss mindestens eine Komponente als “Bestelleinheit – ja” gekennzeichnet werden.
Falls die Konfiguration innerhalb der Hierarchie korrekt sind und Sie erhalten trotzdem diese Fehlermeldung, prüfen Sie bitte Folgendes:
- Haben Sie eventuell neben der Verpackung auch den Basisartikel publiziert? Bitte beachten Sie, dass immer nur die oberste Hierarchieebene publiziert werden soll, da es ansonsten technische Problemen verursachen kann. Nehmen Sie bitte ggf. die Publikation von dem oder den Basisartikeln zurück und lassen Sie nur die oberste Hierarchieebene publiziert.
- Schließen Sie den Artikel und öffnen Sie diesen erneut, damit sich die Ansicht aktualisiert.
- Sollten die oben genannten Punkte nicht zutreffen, versuchen Sie bitte folgendes:
1. Öffnen Sie die höchste Hierarchieebene von dem Artikel (z.B: die Palette oder den Karton)
2. Machen Sie eine Scheinkorrektur indem Sie die Uhrzeit im Feld “Verfügbarkeit: Startdatum (-zeit)” um 1 Minute verändern
3. Speichern Sie die Änderung
4. Versuchen Sie jetzt, die Hierarchie freizugeben
Sollten die oben genannten Punkte nicht funktionieren, wenden Sie sich bitte an Ihren Customer Support: support@atrify.com
4. Systemmeldung „Anomalie“: was muss ich tun?
Ziel ist es, mögliche Abweichungen (Anomalien) in den Daten frühzeitig aufzudecken, damit Artikel von Anfang an korrekt angelegt werden und z.B. Tippfehler vermieden oder untypische Angaben erkannt werden können.
Die ersten Validierungen wurden mit Release 6.7 im atrify publishing installiert und errechnen Werte zur Produktdichte auf der Grundlage der Gewichts- und Maßangaben. Diese Werte vergleicht das System dann mit allen Artikeln im atrify Datenpool, die denselben GPC-Code tragen. Weichen die Angaben zu sehr vom Mittelwert der Datenanalyse ab, erhalten Sie eine entsprechende Nachricht im System.
Wie funktioniert das?
1. Nachdem Sie einen Artikel erstellt und gespeichert oder einen bestehenden Artikel verändert haben, klicken Sie auf „Validieren“.
![]()
- Auf der Grundlage der Maße und des Gewichts berechnet das System einen Wert für die Produktdichte.
- Diese Produktdichte wird mit den Werten anderer Artikel mit demselben GPC-Code verglichen, um untypische Angaben festzustellen.
- Im Falle von Unstimmigkeiten erscheint eine Nachricht, die als Anomalie gekennzeichnet ist, wie in folgendem Beispiel:
![]()
Wo finde ich die Benachrichtigung über Unstimmigkeiten?
Das System informiert darüber an zwei verschiedenen Stellen:
- Wenn Sie den Artikel öffnen, sehen Sie links orangefarbene Punkte neben den Menüpunkten mit Anomalien.
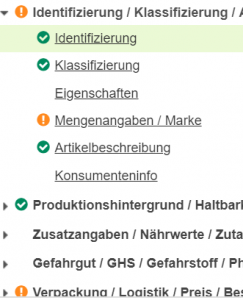
2. Am seitlichen Rand der Eingabemaske:

Was muss ich tun?
Bei den Anomalie-Benachrichtigungen handelt es sich um Hinweise, welche die Freigabe und Publikation nicht verhindern. Die Hinweise werden auf der Grundlage einer Vergleichsanalyse mit anderen Artikeln derselben GPC-Klassifizierung generiert, können für Ihre Artikel aber auch nicht zutreffen.
Verweist der Hinweis auf tatsächliche Fehler, können Sie diese bereinigen.
Sind Ihre Angaben korrekt, können Sie die Hinweise ignorieren.
Beispiel:
Ein Milchpudding mit den Maßen 210 x 142 x 369 mm und einem Bruttogewicht von 2,185 kg. Hier wird wahrscheinlich die intelligente Datenanalyse anschlagen, weil das Gewicht zu hoch ist. Wahrscheinlich muss die Maßeinheit von Kilogramm zu Gramm geändert werden.
5. Warum bekomme ich plötzlich einen roten Punkt im Bereich Steuern/ Importangaben?
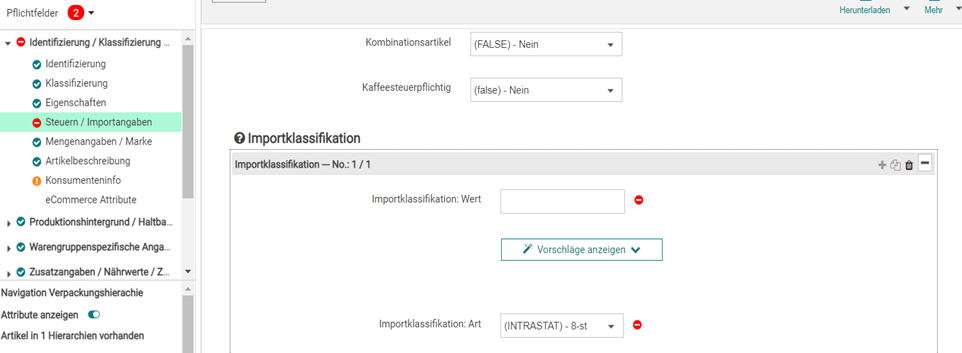
In unserem aktuellen Kompendium finden Sie ab der Seite 262 ff. Informationen zur Importklassifikation und den dazugehörigen Attributen im atrify publishing. Sie können das Kompendium kostenfrei im Downloadcenter auf unserer Webseite herunterladen:
https://www.atrify.com/kundenbereich/download-center/
Bitte achten Sie darauf, dass Sie stets die aktuellste Version des Kompendiums herunterladen, denn mit jedem Release wird das Kompendium aktualisiert.
Weitere Informationen zu dem Thema Zolltarifnummern finden Sie auch auf diesen Webseiten:
English: http://www.tariffnumber.com/
Deutsch: http://www.zolltarifnummern.de/
Francais: http://www.tarifdouanier.eu/
Sollten Sie bei Ihren Artikeln die Attribute „Importklassifikation: Wert“ und „Importklassifikation: Art“ noch nicht ausgefüllt haben, informieren Sie sich bitte unternehmensintern, welche Werte einzutragen sind. Wir bitten Sie um Verständnis, dass der Customer Support u.a. aus rechtlichen Gründen nicht in der Lage ist, Ihnen vorzugeben, wie die Felder auszufüllen sind. Jeder Lieferant sollte für seine Produkte Informationen zur Importklassifikation vorliegen haben und aus diesem Grund fragen Sie bitte die in Ihrem Unternehmen dafür zuständigen Mitarbeiter.
Bitte informieren Sie sich auch bei diesen Feldern intern, welche Menge dort einzutragen ist.
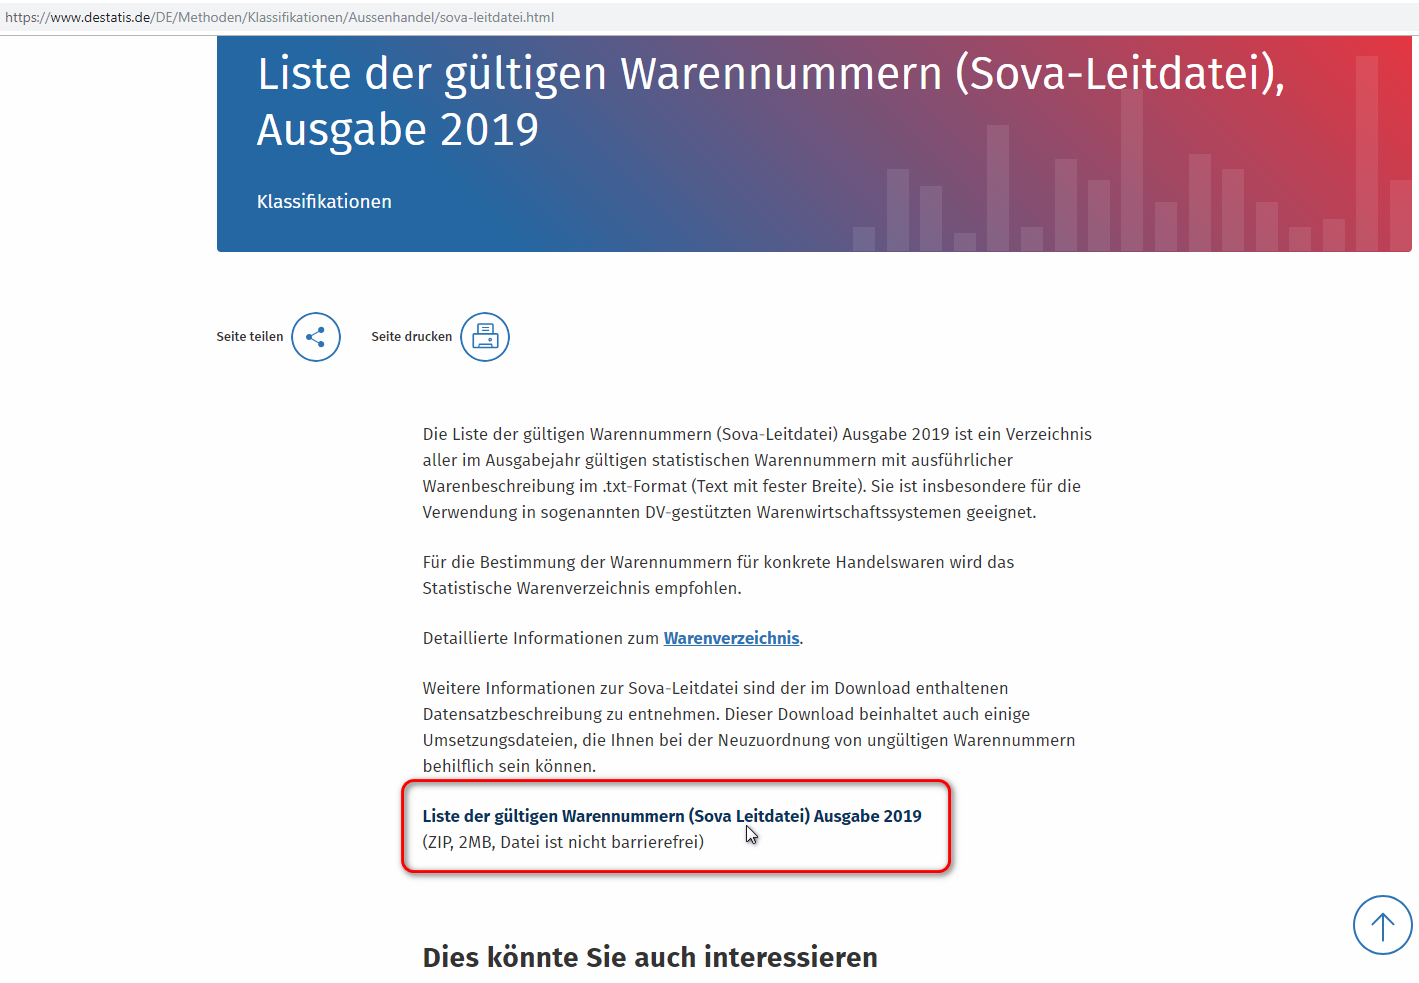
Einige nützliche Informationen zu dieser Thematik finden Sie auf der Internetseite vom Statistischen Bundesamt unter diesem Link: https://www.destatis.de/DE/Methoden/Klassifikationen/Aussenhandel/sova-leitdatei.html
In der Zip Datei „Liste der gültigen Warennummern (Sova Leitdatei) Ausgabe 2019“ (Stand 01.04.2019) finden Sie einige hilfreiche Dokumente zu der Thematik.
Auch bei diesen Attributen bitten wir Sie um Verständnis, dass der Customer Support u.a. aus rechtlichen Gründen nicht in der Lage ist Ihnen vorzugeben, welche Werte einzutragen sind.
6. Warum können die Empfänger meinen Artikel nicht sehen?
- Nur erfolgreich publizierte Hierarchien (grünes Häkchen) sind für die Empfänger sichtbar. Artikel mit dem Status “Entwurf” oder “Freigegeben” sind für die Empfänger noch nicht sichtbar.
- als erstes, überprüfen Sie bitte, ob die Artikel entweder publiziert oder im Rahmen einer publizierten Hierarchieebene gesendet wurden (Status: Artikel gesendet)
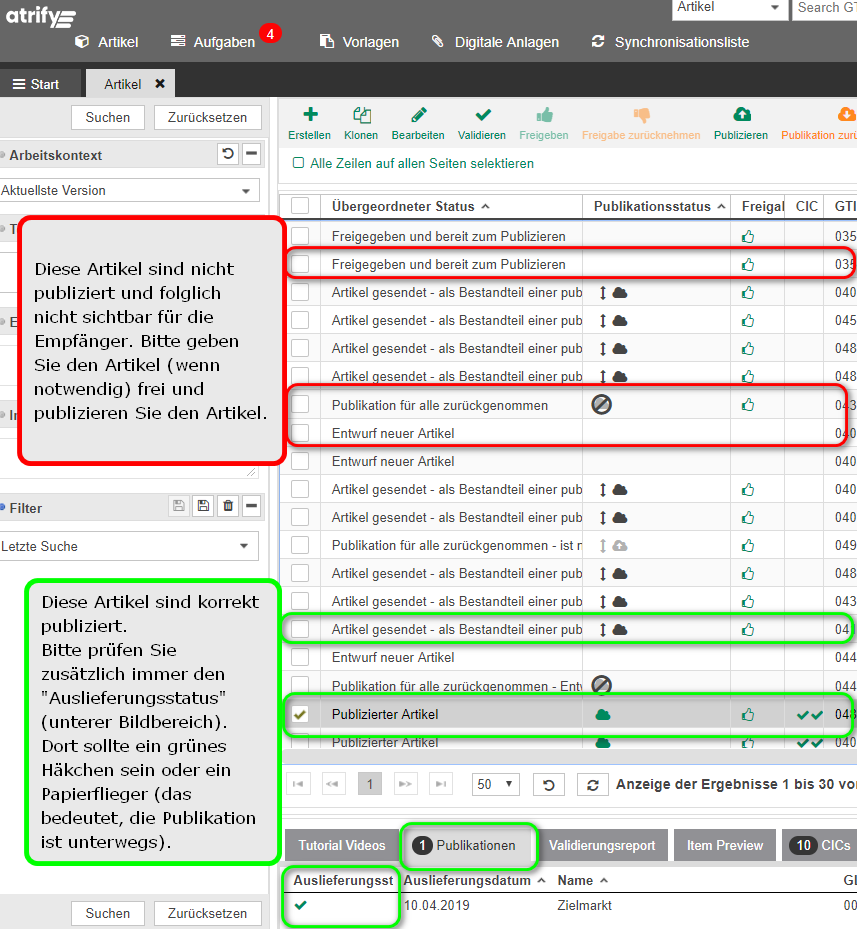
Zudem prüfen Sie bitte, ob Sie vom atrify Datenpool eine Exception erhalten haben, die angibt, ob Ihre Hierarchie vom atrify Datenpool aufgrund eines Fehlers nicht angenommen wurde. Sollten Sie die Exception nicht verstehen, kontaktieren Sie bitte den Customer Support: support@atrify.com

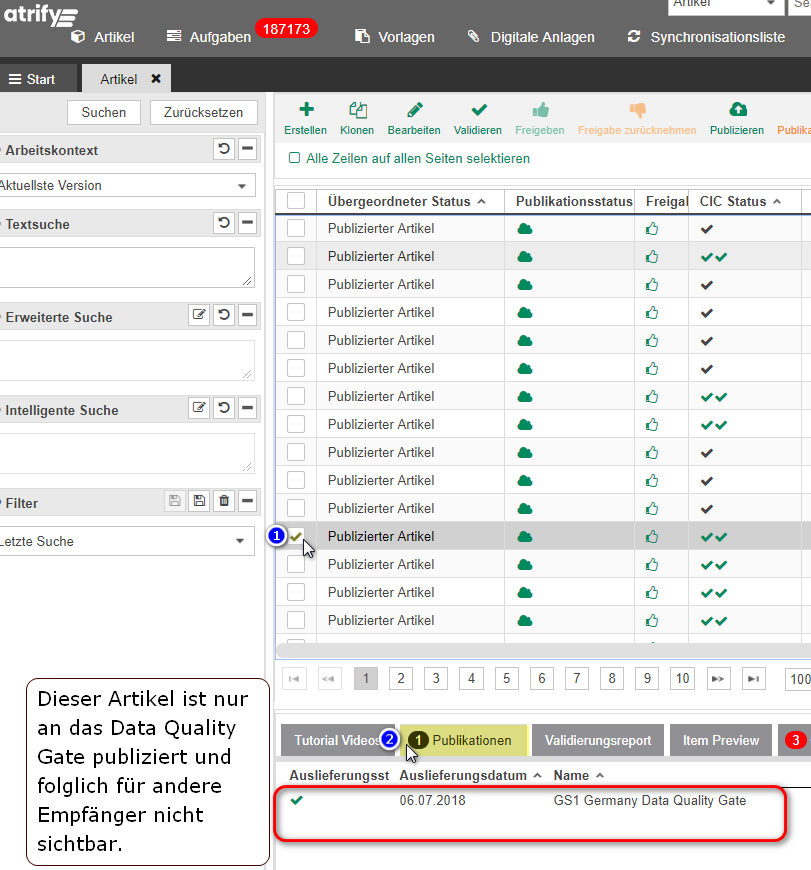
- Die Daten wurden an den falschen Empfänger publiziert z.B. nur an das Data Quality Gate.
Bitte prüfen Sie zunächst wohin die Daten publiziert wurden und publizieren Sie die Daten ggf. an den richtigen Empfänger.
- Die GTINs wurden richtig publiziert, allerdings existiert keine Subskription zwischen Ihrer Firma und den Empfängern; eine “Subskription” ist eine technische Einstellung, die es den jeweiligen Empfängern erlaubt, Ihre Daten zu erhalten.
Kontaktieren Sie bitte Ihren Ansprechpartner (Empfänger) und bitten Sie ihn zu überprüfen, ob eine Subskription eingerichtet wurde.
4. Es kann manchmal passieren, dass es im System einen generellen Verzug gibt; Daten können nach ein paar Stunden – oder manchmal noch später, geschickt werden. Bitte beachten Sie: Artikel, die an den ganzen Zielmarkt publiziert werden, werden später geliefert als Daten, die nur an bestimmte GLNs publiziert werden. Verschiedene Ursachen können die Publikation ebenfalls verzögern: Überlastung des Systems oder andere technische Gründe. Kontaktieren Sie dazu bitte unseren Support, falls es eine deutliche Verzögerung gibt: support@atrify.com
Bearbeitung von Artikeln
1. Wie kann ich eine Publikation mit Excel zurückziehen?
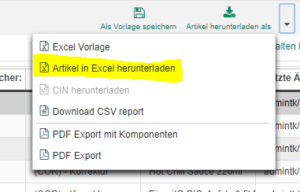
…oder die Publikation zahlreicher Artikel auf einmal zurücknehmen möchten, laden Sie die Artikel bitte in Excel herunter. Markieren Sie sie hierfür in der Artikelübersicht und klicken Sie in Ihrem System rechts oben auf „Artikel herunterladen als“ > „Artikel in Excel herunterladen“.
Öffnen Sie in der Excel-Tabelle das letzte Blatt. Dieses trägt den Namen „Publishing“. Dort ändern Sie den ActionCode von ADD zu DEL.
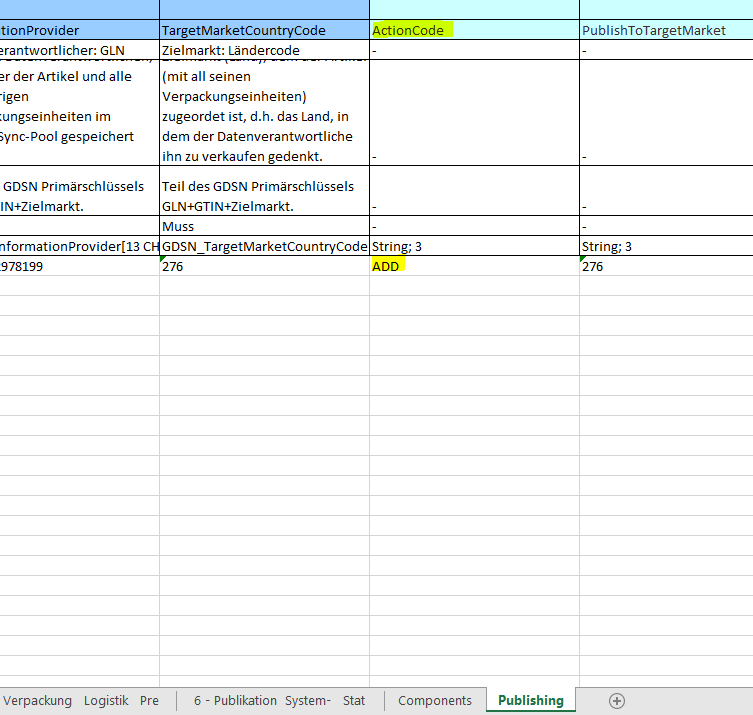
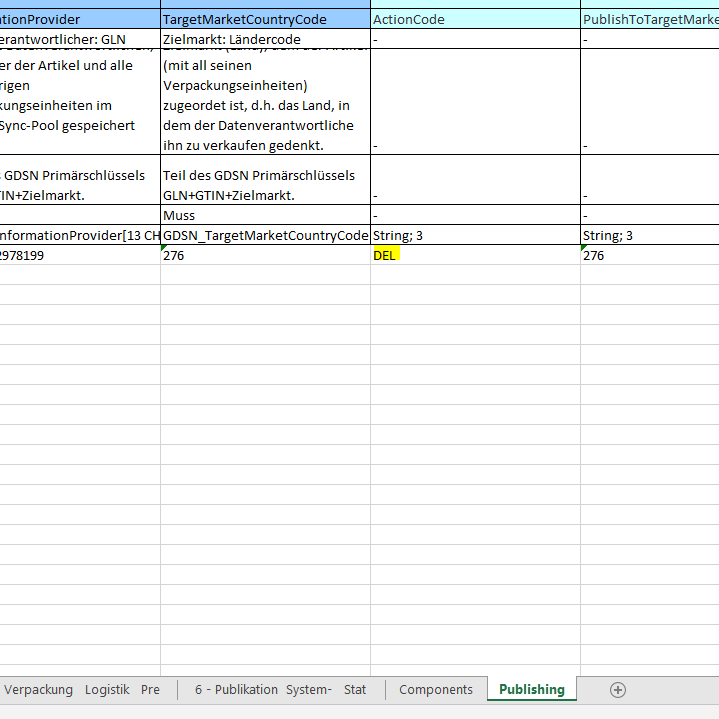
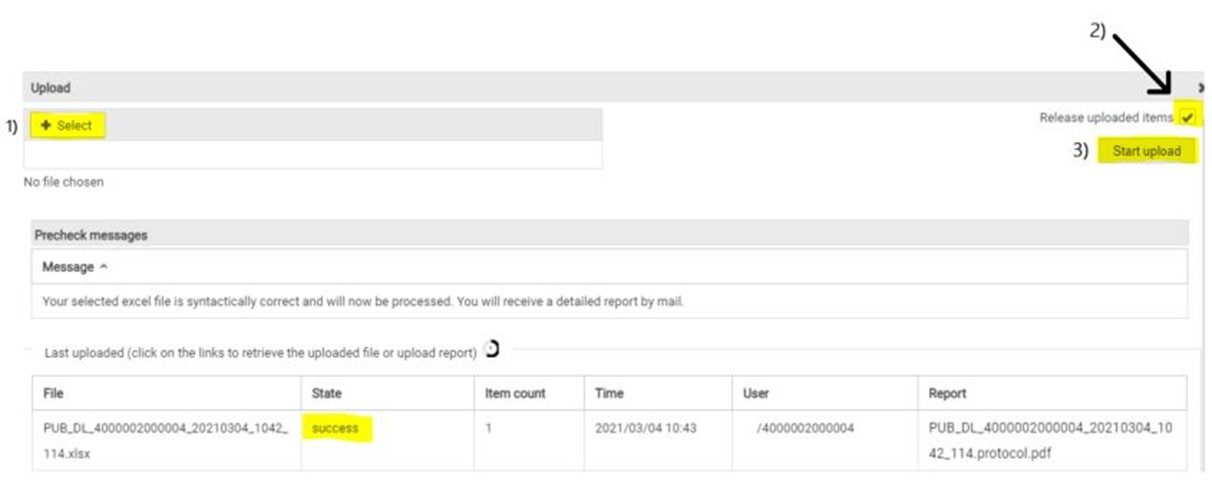
Speichern Sie das Dokument und importieren es über „Excel Import“. Diese Funktion finden Sie in Ihrem atrify publishing-System oben rechts, wenn Sie sich in der Artikelübersicht befinden. Es öffnet sich ein neues Fenster. Klicken Sie dort auf “+ Auswählen” und wählen Sie Ihre Excel Datei aus. Indem Sie ein Häkchen bei “Hochgeladene Artikel freigeben” setzen, können Sie die Artikel direkt freigeben und Sie müssen dies nicht anschließend manuell im atrify publishing erledigen. Klicken Sie nun auf “Hochladen beginnen”. Sobald in der Spalte “Status – success” steht, ist der Upload abgeschlossen und Sie können das Fenster schließen.

2. Wie kann ich den Artikeltyp ändern z.B. einen Basis- in einen Verpackungsartikel umwandeln?
Bitte öffnen Sie den Artikel und prüfen Sie das Attribut „Basisartikel“. Dort sollte „(false) – Nein“ stehen.
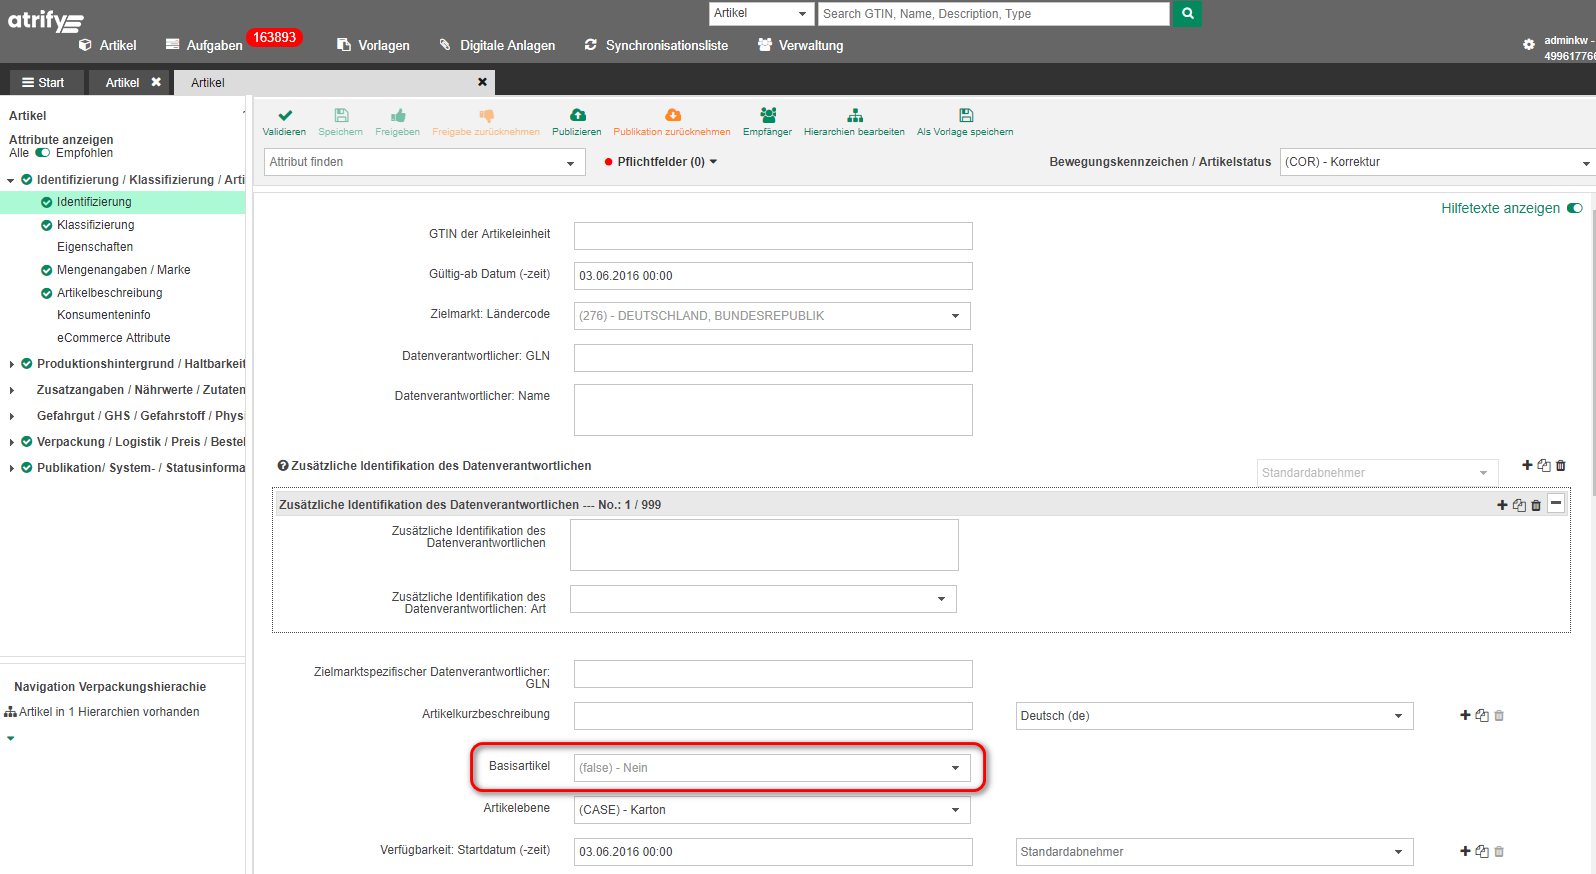
Steht dort „(true) – Ja”, dann wurde der Artikel als Basisartikel angelegt und kann folglich auch nicht mit einem anderen Basisartikel verknüpft werden. Man kann das Attribut Basisartikel (Ja/Nein), dass beim Auswählen des Artikeltyps (Verpackung/Basisartikel) gesetzt wird, nachträglich nicht ändern; es ist nur möglich, den falschen Artikel zu löschen und wiederherzustellen. Bitte folgen Sie dafür den folgenden Schritten:
Teil I – Publikation zurücknehmen
- Nehmen Sie die Publikation zurück, indem Sie auf „Publikation zurücknehmen” klicken – sollte der Button nicht aktiv sein, geben Sie den Artikel zunächst frei und warten Sie, bis die Freigabe angekommen ist & klicken Sie dann auf „Publikation zurücknehmen”
- Nehmen Sie die Freigabe zurück
Teil II – Artikel als Vorlage speichern, Löschen & neu anlegen
- Öffnen Sie den falsch angelegten Artikel
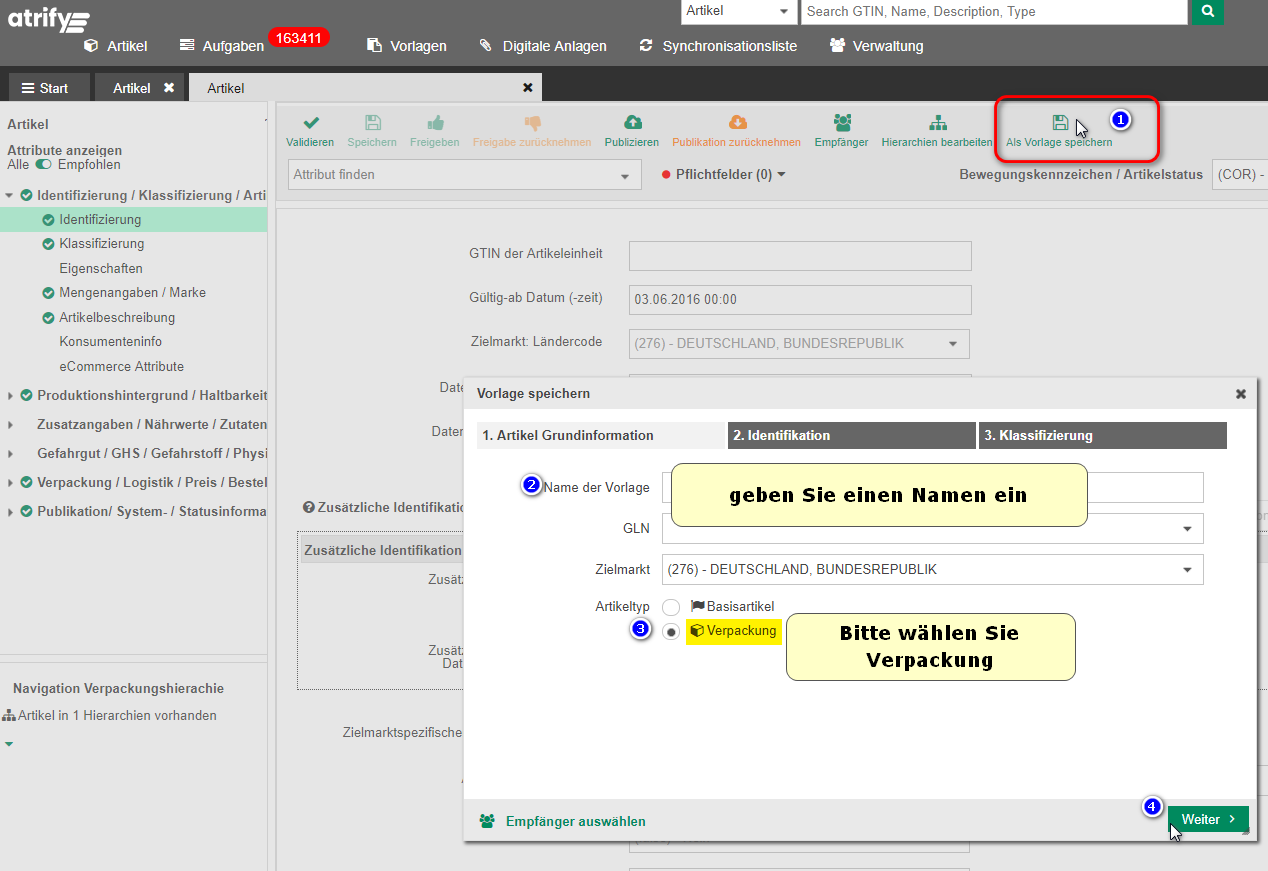
- Speichern Sie den Artikel als Vorlage:
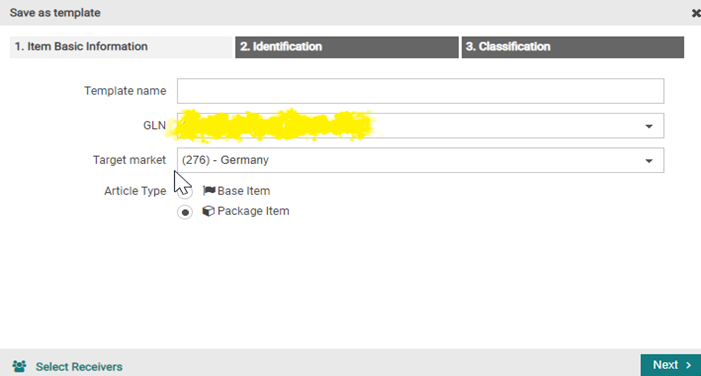
- Klicken Sie auf den Button „Als Vorlage speichern“
- Es öffnet sich ein neues Fenster – geben Sie der Vorlage einen Namen; die restlichen Eingaben werden übernommen
- Wählen Sie bei „Artikeltyp“ am besten direkt „Verpackung”
- Klicken Sie anschließend auf „weiter“ und kontrollieren Sie die vorausgefüllten Eingaben und klicken Sie anschließend auf „Erstellen“
- Klicken Sie auf „Speichern“, damit die Informationen nicht verloren gehen
- Schließen Sie die Vorlage und gehen Sie in die Artikelübersicht
- Suchen Sie den falsch angelegten Artikel, den Sie löschen wollen
- Klicken Sie den Artikel 1x an, um ihn somit auszuwählen
- Klicken Sie auf „löschen”

- Legen Sie den Artikel wieder an, mit der gleichen GTIN und damit Sie nicht alle Daten erneut eingeben müssen, verwenden Sie die Vorlage
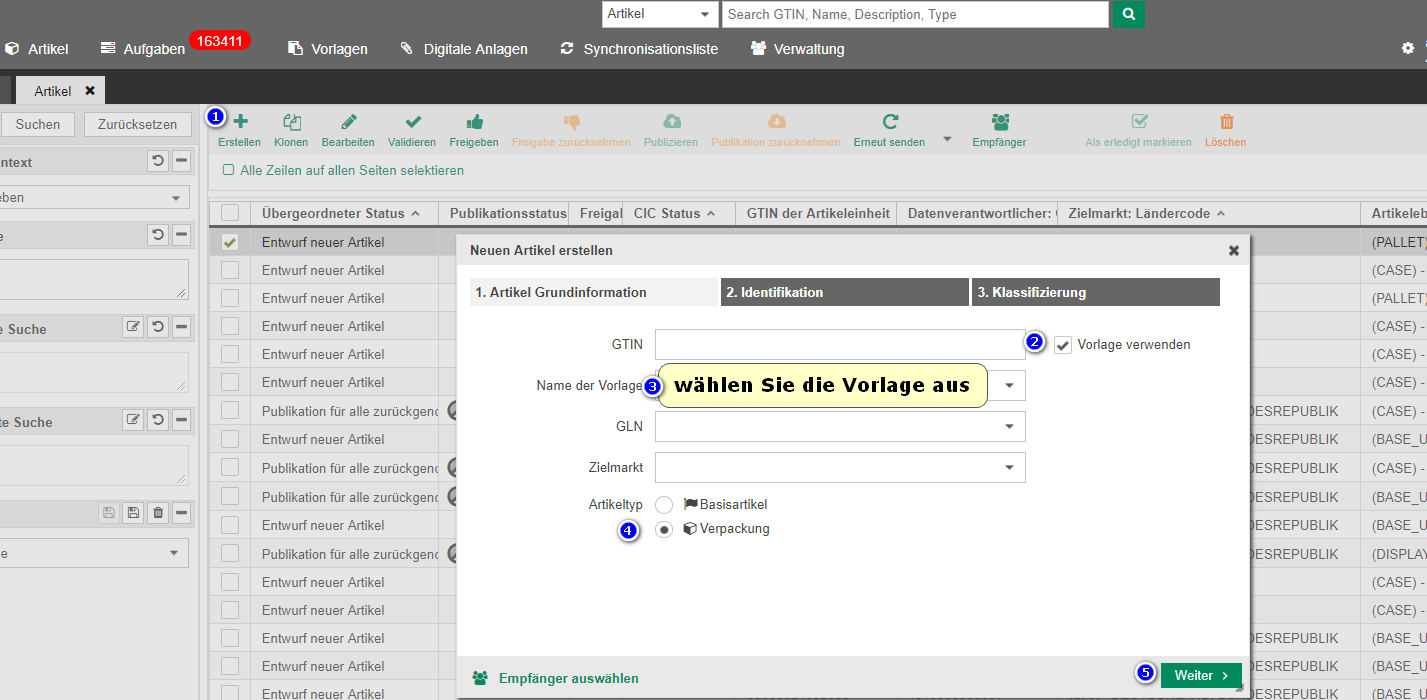
- Bitte achten Sie unbedingt darauf, dass Sie bei “Artikeltyp” das Häkchen bei Verpackung setzten
- Bitte prüfen Sie anschließend alle Eingaben im Artikel kritisch und füllen Sie ggf. Pflichtfelder aus
Teil III – Verpackungsartikel mit dem Basisartikel verbinden
- Verbinden Sie die Verpackung mit dem Basisartikel. Eine genaue Anleitung finden Sie in der FAQ: „Wie verbinde ich Verpackungen mit Basisartikeln?“
- Klicken Sie auf freigeben – Hierarchien freigeben & Publizieren Sie die Hierarchie. Bitte klicken Sie auf freigeben und publizieren immer nur von der obersten Hierarchieebene. Es ist NICHT notwendig alle Artikel einer Hierarchie zu publizieren.
3. Wie kann ich einen Artikel löschen?
Ausnahme: Der Artikel wurde falsch angelegt & die GTIN soll wieder benutzt werden
Folgen Sie den Schritten 1 – 3 unter “Löschen (physisches Löschen) aus dem atrify publishing”.
Vorbereitung:
- Artikel, die publiziert sind oder es mal waren, müssen in einem freigegebenen und publizierten Zustand bzw. Teil einer publizierten Hierarchie sein. Invalide Artikel müssen zunächst in Ordnung gebracht und freigegeben werden. Dies muss getrennt vom logischen Löschvorgang geschehen. Bitte korrigieren Sie also zuerst eventuelle Fehler und folgen Sie erst dann den Schritten vom Logischen Löschvorgang.
- Sollte eine Publikation schon zurückgenommen worden sein, publizieren Sie die Artikel bitte erneut und beginnen Sie erst, wenn die Publikation angekommen ist, mit dem logischen Löschvorgang.
- Analysieren Sie bzgl. Ihrer Hierarchien genau, was gelöscht werden soll. Existiert der Basisartikel weiter? Wird vielleicht nur die Verpackungsvariante nicht mehr benötig?
Logischer Löschvorgang (Artikel abmelden)
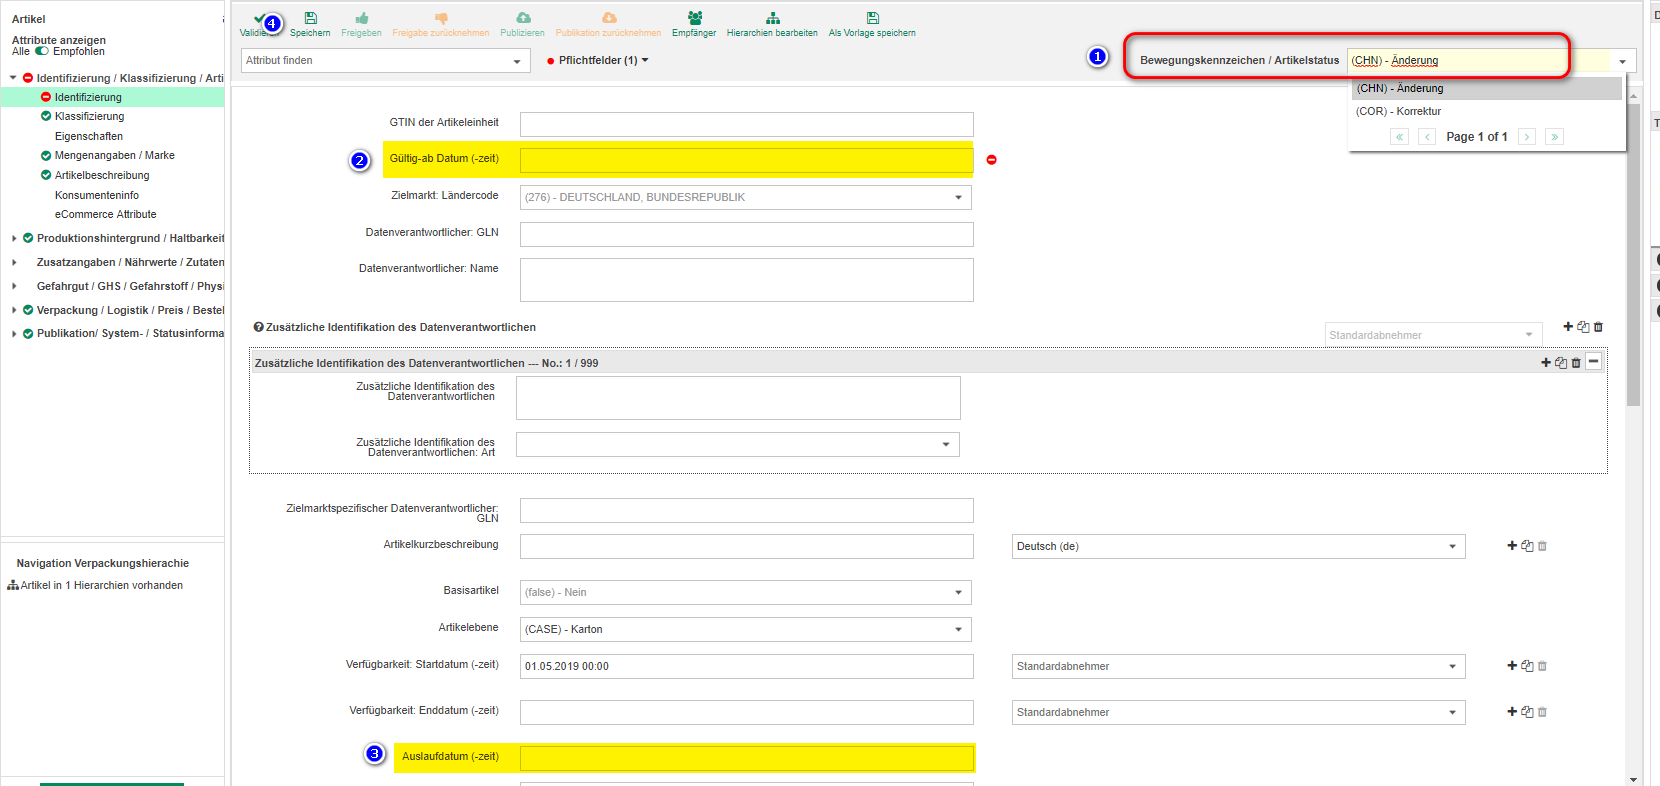
- Sie stellen “Bewegungskennzeichen / Artikelstatus” auf “Änderung (CHN)”
- Sie setzen ein aktuelles “gültig-ab-Datum”
- Sie setzen ein Auslaufdatum
- Speichern und freigeben
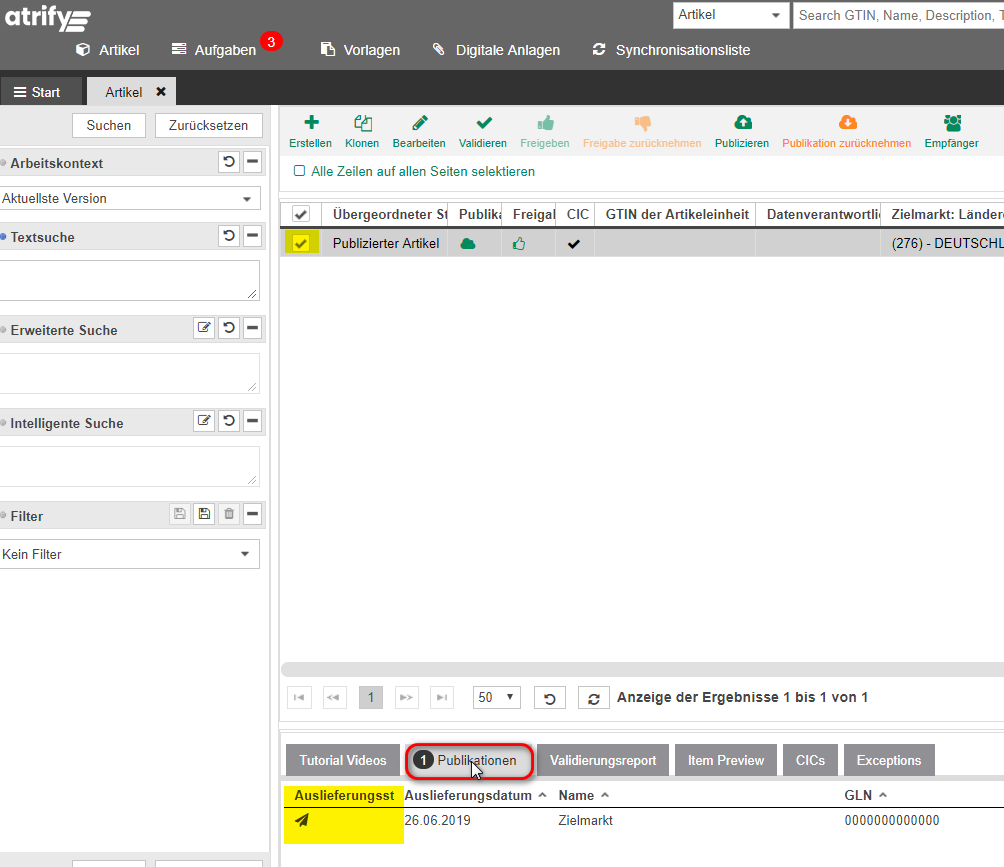
- Warten Sie bis die Freigabe angekommen ist. Das können Sie prüfen, indem Sie den Artikel schließen und erneut öffnen. Klicken Sie dann rechts auf das Plus neben “Publikationen”. Dort befindet sich zunächst ein Papierflieger, das bedeutet die Freigabe ist unterwegs, aber noch nicht angekommen.

Schließen Sie den Artikel wieder und warten Sie eine Weile. Öffnen Sie den Artikel erneut und warten Sie so lange, bis aus dem Papierflieger ein grünes Häkchen wird.

Sie können den Auslieferungsstatus auch in Ihrer Artikelübersicht im unteren Bildbereich prüfen. Wählen Sie dafür den publizierten Artikel aus und klicken Sie im unteren Bildbereich auf “Publikationen”.
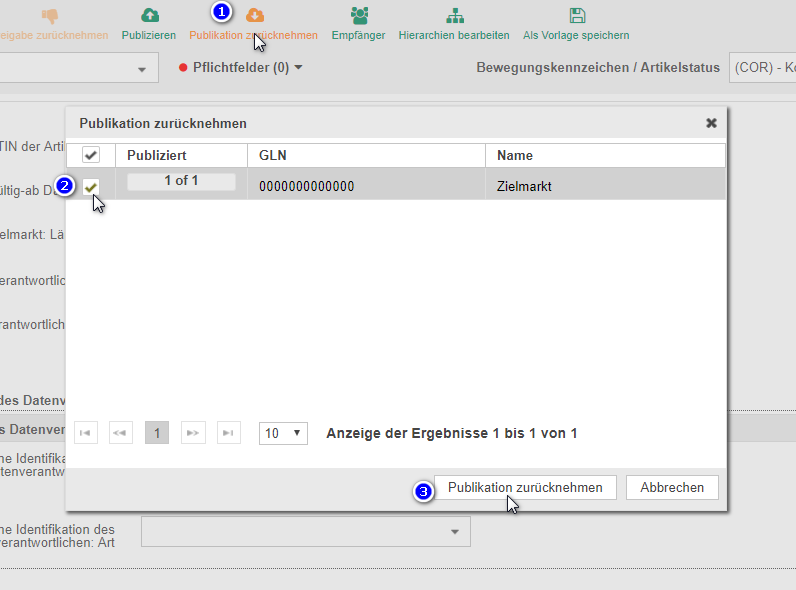
6. Publikation zurücknehmen
Hinweise: Wenn ein Basisartikel gelöscht werden soll, so muss die sortenreine Verpackung/ Palette auch gelöscht werden. Tragen Sie in allen Ebenen ein Auslaufdatum ein (speichern) und geben die Hierarchie über die höchste Ebene frei.
Ist der Basisartikel Komponente eines Sortiments (Display), so ist zu erwägen, ob das Sortiment nicht auch gelöscht werden muss. Der Austausch von Komponenten ist in der Regel nicht gestattet. Bitte setzen Sie sich mit den GTIN- Vergaberegeln (https://www.gs1.org/1/gtinrules/index.php//de/) auseinander und/ oder besprechen dies mit dem/ den Empfänger /n
Wird nur eine Verpackung gelöscht, sind die Daten nur bei der betroffenen Verpackungs-GTIN einzupflegen.
Wenn Sie vor längerer Zeit das Auslaufdatum gepflegt hatten, aber den Artikel nicht mit CHN freigegeben hatten und jetzt von Handel aufgefordert werden, den Artikel abzumelden, so setzen Sie das “gültig-ab-Datum” soweit in die Vergangenheit, dass es nicht mehr als 6 Monate vom schon eingetragen Auslaufdatum liegt. Lassen Sie das Auslaufdatum unberührt.
Löschen (physisches Löschen) aus dem Publishing:
Wie oben schon angedeutet, werden beim physischen Löschvorgang nur die Artikel aus dem Publishing gelöscht. Auf dem Server (DSE) und in den Händler- Katalogen bleiben die Artikel mit letztem Status erhalten. Löschen Sie einen Artikel, verlieren Sie die Kontrolle über ihn. Der Support kann den Artikel ebenfalls nicht mehr bewegen oder wiederherstellen. Unter Umständen muss der Artikel von Ihnen neu angelegt werden. Sie sollten sich also wirklich gut überlegen, ob Sie den Artikel wirklich physisch aus dem atrify publishing löschen wollen. In jedem Fall sollten Sie sich aber unbedingt sicher sein, dass der Artikel vorher korrekt beim Handel abgemeldet ist (siehe Logischer Löschvorgang).
- Publikation zurücknehmen, falls nicht schon geschehen. Warten bis die Einträge im Publikationsfenster verschwinden.
- Wechseln in den Basisartikel und Freigabe (für Hierarchie) zurücknehmen. Ist der Basisartikel noch in einer anderen Hierarchie aktiv, so erfolgt die Rücknahme über die zu löschende Verpackung
In der Übersicht “Artikel” entsprechenden Artikel markieren. Der Button “löschen” wird jetzt aktiv. Klicken Sie diesen an und der Artikel wird gelöscht.
Hinweis: Um einen Artikel zu löschen, der Teil mehrerer Hierarchien ist, müssen alle Publikationen dieser Hierarchien zurückgenommen werden. Trennen Sie die Hierarchien nicht. Der Artikel trennt sich beim Löschen von selbst aus der Hierarchie.
4. Wie kann ich eine Hierarchie ändern?
zum Video
Sollte der Artikel noch nicht publiziert sein, dann wird in diesem Trainingsvideo erklärt, wie die Hierarchien im atrify publishing bearbeitet werden können:
zum Video
5. Wie verbinde ich Verpackungen mit Basisartikeln?
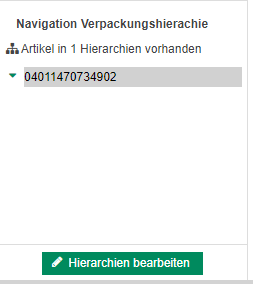
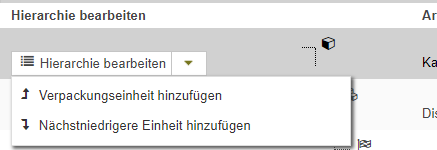
Danach können Sie unter „Hierarchie bearbeiten“ die Verpackung mit anderen Artikeln verknüpfen. Möchten Sie den Basisartikel anhängen, wählen Sie „Nächstniedrigere Einheit hinzufügen“.
Suchen Sie dann nach der GTIN des Basisartikels, markieren Sie diese und klicken Sie auf „Hinzufügen“.

Nun müssen Sie noch angeben, wie oft der Basisartikel in der Verpackung enthalten ist.

Sie können einer Verpackung auch verschiedene Basisartikel hinzufügen. Wiederholen Sie den oben beschriebenen Vorgang dafür einfach. Verfahren Sie auf dieselbe Weise, wenn Sie z.B. ein Display oder eine Palette anlegen.
Tipp: Schauen Sie sich auch unser Trainingsvideo zu dem Thema an: zum Video
6. Muss ich bei Korrekturen die Publikation zurücknehmen?
Die Bearbeitung einer Hierarchie erfordert hingegen, dass die Daten nicht publiziert und nicht freigegeben sind. Wenn Sie bei einer publizierten Hierarchie z.B. die Anzahl der in der Verpackung enthaltenen Basisartikel ändern oder eine Hierarchiekomponente hinzufügen müssen, ist es nötig, vorher die Publikation und die Freigabe der Hierarchie zurückzunehmen siehe auch FAQ: Wie kann ich eine Hierarchie ändern?
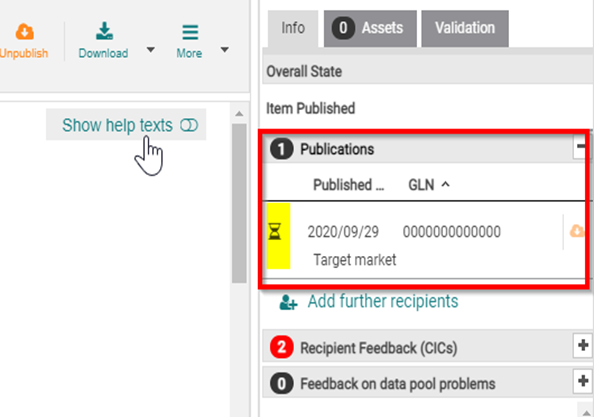
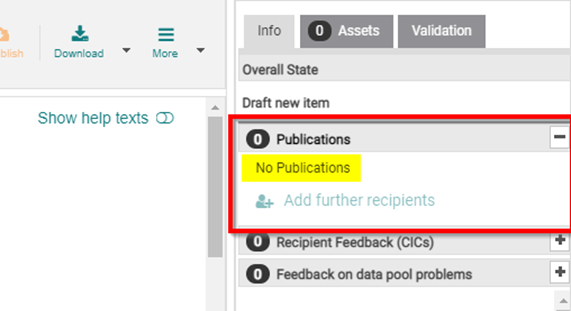
Um schwer zu behebende Fehler bei der Datenübertragung zu vermeiden, ist es hierbei besonders wichtig, dass Sie die nötigen Wartezeiten einhalten. Wenn Sie auf „Publikation zurücknehmen“ geklickt haben, haben Sie den Prozess der Publikationsrücknahme zunächst bloß angestoßen. Wo vorher grüne Häkchen im Publikationsfeld waren, sind nun Papierflieger zu sehen. Erst, wenn das Feld leer ist und dort der Wortlaut “Keine Publikationen” steht, ist der Datensatz nicht mehr publiziert.
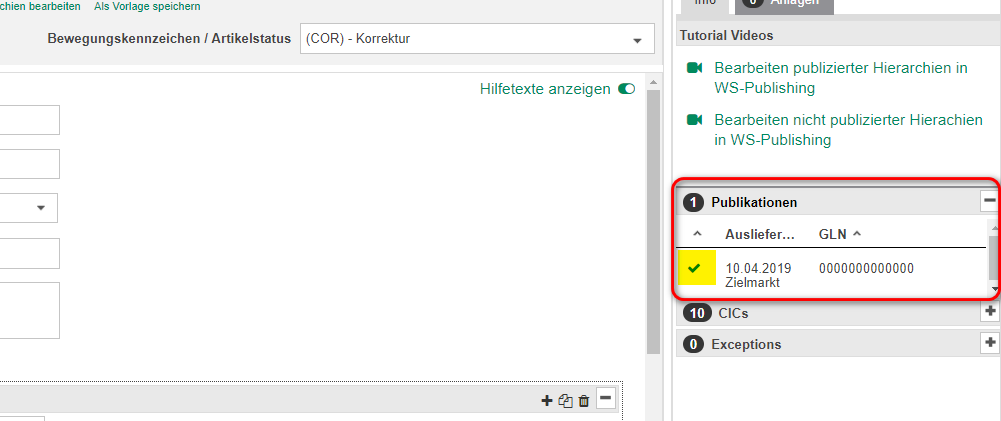
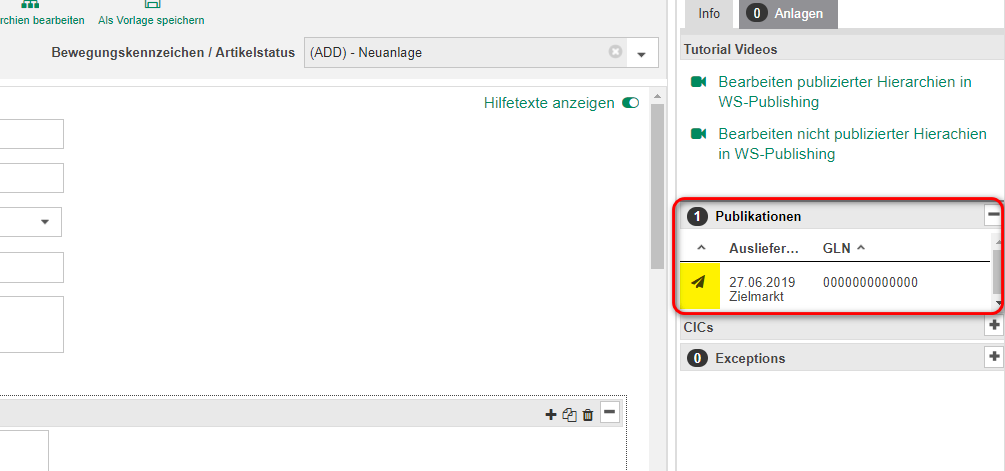
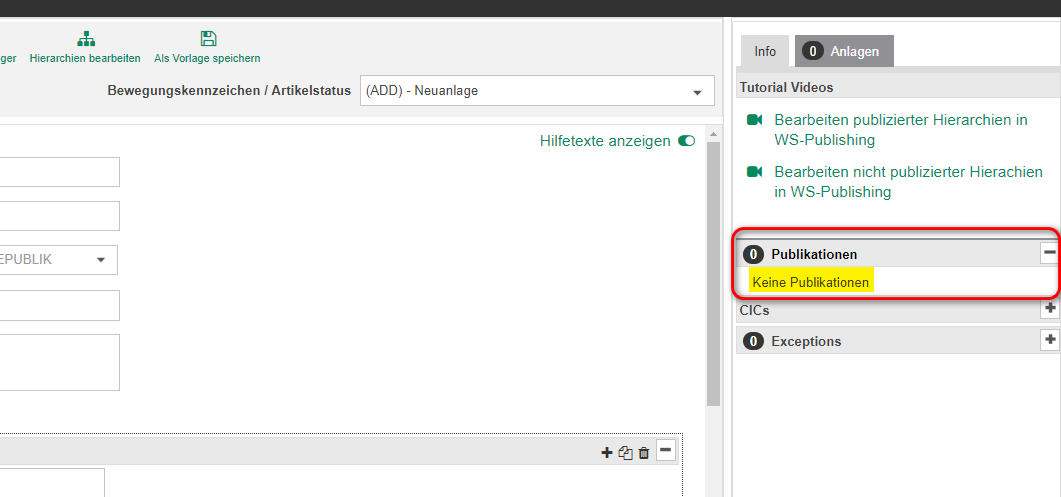
Daraufhin können Sie die Freigabe zurücknehmen und die gewünschten Änderungen vornehmen.
Auch nachdem Sie einen Datensatz (wieder) freigegeben haben, sollten Sie erst einmal abwarten, ob Exceptions eintreffen und nicht sogleich publizieren. Wenn nach 1-2 Stunden keine Exceptions eingetroffen sind, können Sie die Daten i.d.R. publizieren.
7. "Korrektur" oder "Änderung"?

(COR) – Korrektur: Diese Einstellung wird gewählt, wenn man falsche Angaben berichtigen oder weitere Informationen hinzufügen möchte.
(CHN) – Änderung: Diese Einstellung wird gewählt, wenn sich am realen Produkt bzw. an der logistischen Einheit etwas ändert, oder auch, wenn ein Ereignis (z.B. Löschung) angekündigt wird.
Da die GTIN eine eindeutige Identifikation eines Produkts oder einer logistischen Einheit gewährleisten soll, stellt sich die Frage, in welchem Maße ein Artikel geändert werden darf, um weiterhin als derselbe Artikel zu gelten. Dies bestimmen die GTIN- Vergaberegeln:
https://www.gs1.org/1/gtinrules/index.php//de/
Die Vergaberegeln sind zwar, soweit möglich, auch im Publishing implementiert, allerdings sollte ein Lieferant mit diesen Regeln vertraut sein, um schon im Vorfeld (bei der Planung von Produktänderungen) zwischen einer zulässigen Änderung oder der Vergabe einer neuen GTIN wählen zu können.
Wichtig: Wenn bei einer Aktualisierung eines Datensatzes sowohl eine Korrektur als auch eine Änderung ansteht, so muss die Aktualisierung in 2 Schritten geschehen.
Beispiel:
Bei einem Karton, der gelöscht werden soll, stimmt das Bruttogewicht bezüglich seines Inhalts nicht:
- (COR) – Korrektur: Berichtigung des Bruttogewichts -> Speichern -> Freigeben
- (CHN) – Änderung: Neues gültig-ab-Datum, Auslaufdatum -> Speichern-> Freigeben. (Siehe auch im FAQ unter Punkt 3. Wie kann ich einen Artikel löschen?)
Würde die Berichtigung des Bruttogewichts in Schritt 2 erfolgen, würde u.U. die Vergaberegel anschlagen, dass Gewichte und Maße sich nur bis zu 20% ändern dürfen.
8. Wie lange dauert es, bis die Daten an den Empfänger geliefert werden?
Sie können den Stand der Publikation anhand des Auslieferungsstatus prüfen. Öffnen Sie dafür den Artikel und klicken Sie rechts bei dem Reiter “Info” auf das Plus neben “Publikationen”.
Dort befindet sich zunächst ein Papierflieger, das bedeutet die Publikation ist unterwegs, aber noch nicht angekommen.

Schließen Sie den Artikel wieder und warten Sie eine Weile. Wenn Sie dann ein grünes Häkchen im Bereich Auslieferungsstatus sehen, war Ihre Publikation erfolgreich.

Sie können den Auslieferungsstatus auch in Ihrer Artikelübersicht im unteren Bildbereich prüfen. Wählen Sie dafür den publizierten Artikel aus und klicken Sie im unteren Bildbereich auf “Publikationen”.
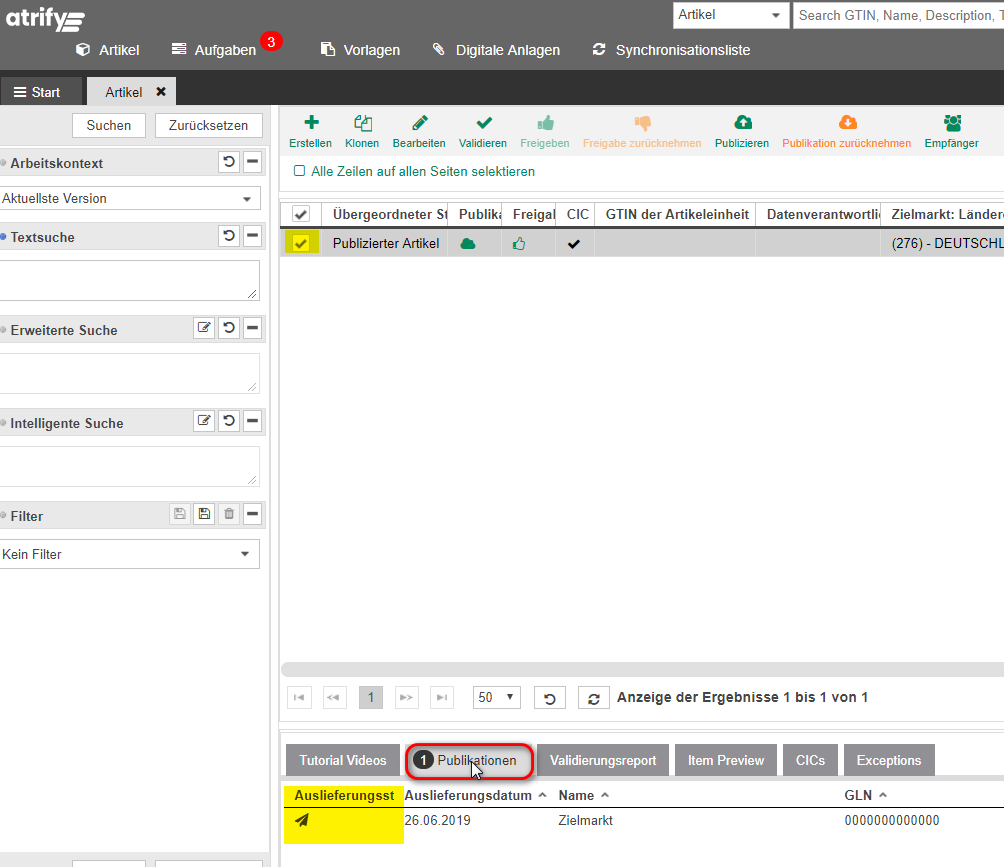
Falls sich Ihre Publikation deutlich verzögert, prüfen Sie Ihre Publikation bitte unter diesem Aspekt: Fehlermanagement → 6. Warum können die Empfänger meine Artikel nicht sehen?
9. Wie lege ich einen Pfandartikel an?
Im Folgenden erklären wir Ihnen an einem Beispiel, wie man Pfandartikel am besten anlegen sollte. Bitte beachten Sie, dass es sich bei den folgenden GTIN´s und Angaben lediglich um ein Beispiel handelt. Sie müssen die Angaben natürlich für Ihr Produkt entsprechend anpassen.
Für die Anlage dieses Pfandkonstrukts brauchen Sie insgesamt 5 GTINs, die in 2 unterschiedlichen Hierarchien verknüpft werden:
I. Hierarchie = leerer Kasten bestehend aus: leeren Flaschen + leerem Rahmen
1. GTIN (z.B. 04044444555555) für die leere Flasche: als Basisartikel erstellen

2. GTIN (z.B. 04033333444445) für den leeren Kasten (bzw. Rahmen) ohne Flaschen: als Basisartikel erstellen
3. GTIN (z.B. 04055555333338) für die Anlage eines Displays: als Verpackung erstellen (es wird ein Display bestehend aus einer leeren Flaschen + leerem Kasten bzw. Rahmen)
Im Bereich „Klassifizierung“ können Sie Lager – / Transportbehälter (92000000) wählen
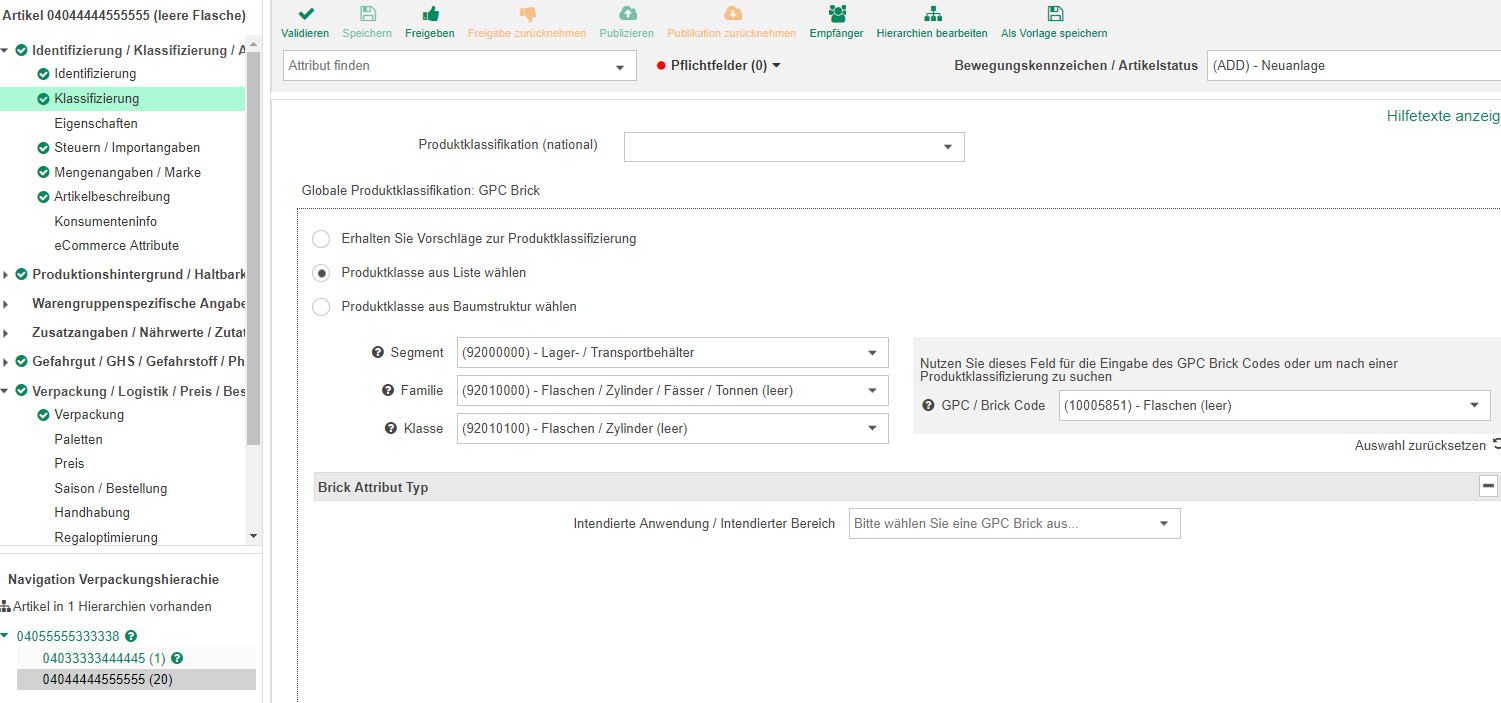
Beispiel: Produktklassifizierung Pfandflasche
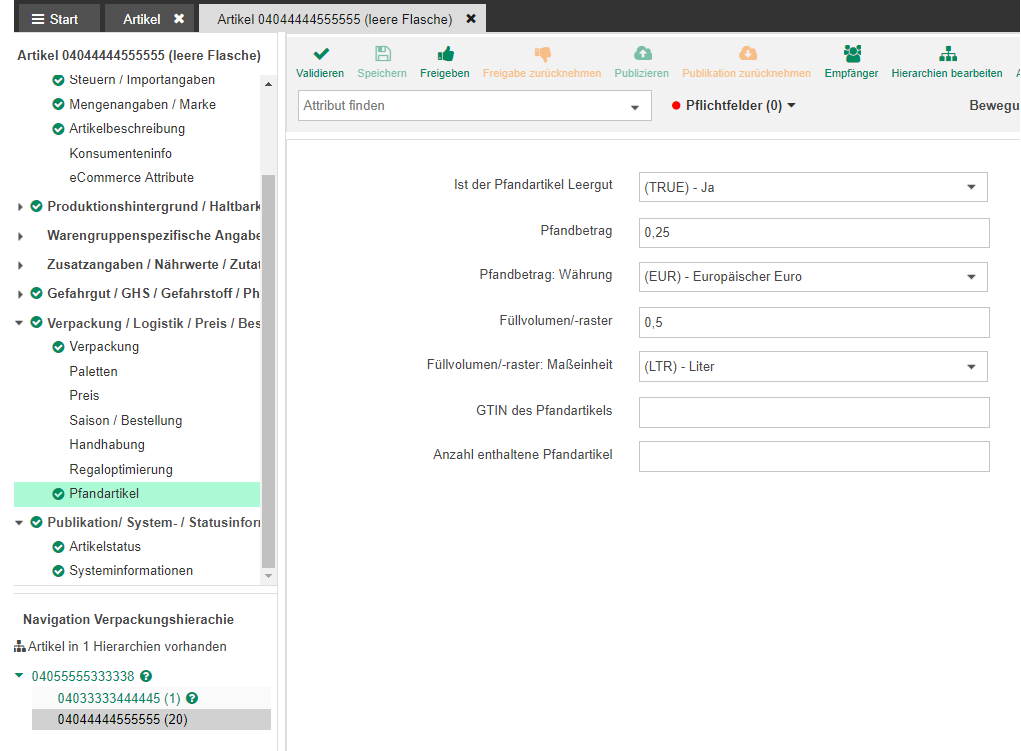
Im Bereich „Verpackung / Logistik / Preis / Bestellung / Pfandartikel“ unter „Pfandartikel“ sollten Sie die folgende Konfiguration eingeben:
- Ist der Pfandartikel Leergut: (TRUE) – Ja
- Pfandbetrag: den numerischen Wert hier eingeben
- Pfandbetrag: Währung: z.B. (EUR) – Europäischer Euro
- Füllvolumen/-raster: z.B. 1
- Füllvolumen/-raster: Maßeinheit: den Wert wählen
Hier als Beispiel die Eingaben bei einer leeren Pfandflasche:
Hinweis: Bitte vergessen Sie nicht die Pfandhierarchie an den Handel zu publizieren.
II. Hierarchie = voller Kasten + volle Flaschen
4. GTIN (z.B. 04015000010153) für die Vollgutflasche: als Basisartikel erstellen
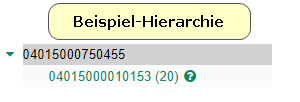
5. GTIN (z.B. 04015000750455) für den Vollgutkasten: als Verpackung erstellen
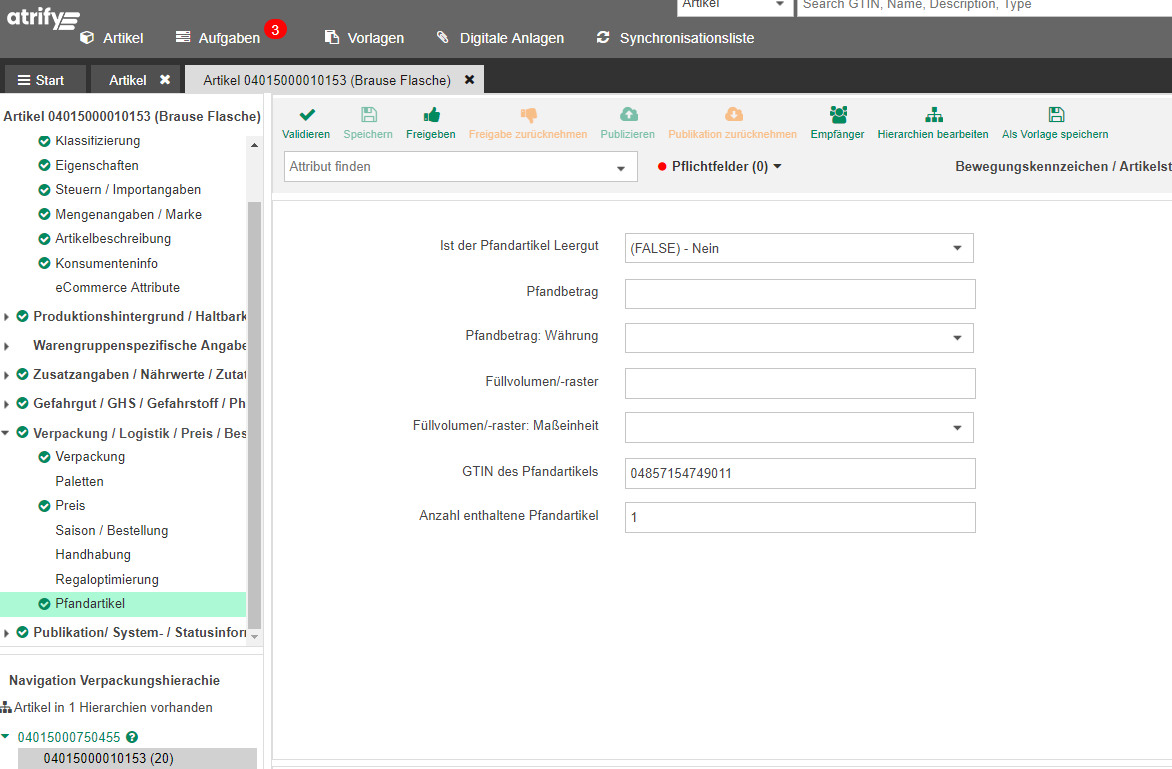
Im Bereich „Verpackung / Logistik / Preis / Bestellung / Pfandartikel“ unter „Pfandartikel“ sollten Sie die folgende Konfiguration eingeben, um das Vollgut als Pfandartikel zu kennzeichnen und um es mit dem Leergut zu verknüpfen:
- Ist der Pfandartikel Leergut: (FALSE) – Nein
- GTIN des Pfandartikels: die GTIN des dazugehörigen Pfandartikels
- Anzahl enthaltene Pfandartikel: z.B. 1 (Wie oft kann der Leergutartikel dem Vollgutartikel zugeordnet werden?)
Hier als Beispiel die Eingaben bei einer Vollgut-Flasche:
Hinweis: (aktualisiert am 02.09.2021 nach Absprache mit GS1 Germany)
Bitte beachten Sie, dass auch auf Verpackungen (Packs, Kartons, Displays) der Vollgutseite, die nicht selbst aber deren Inhalt bepfandet ist, Pfandangaben zu machen sind.
Das Feld “GTIN des Pfandartikels” ist mit der Leergut- GTIN des Basisartikels zu befüllen.
Die folgende Abbildung stellt noch einmal grafisch die Verknüpfung zwischen Pfand und Leergut dar.
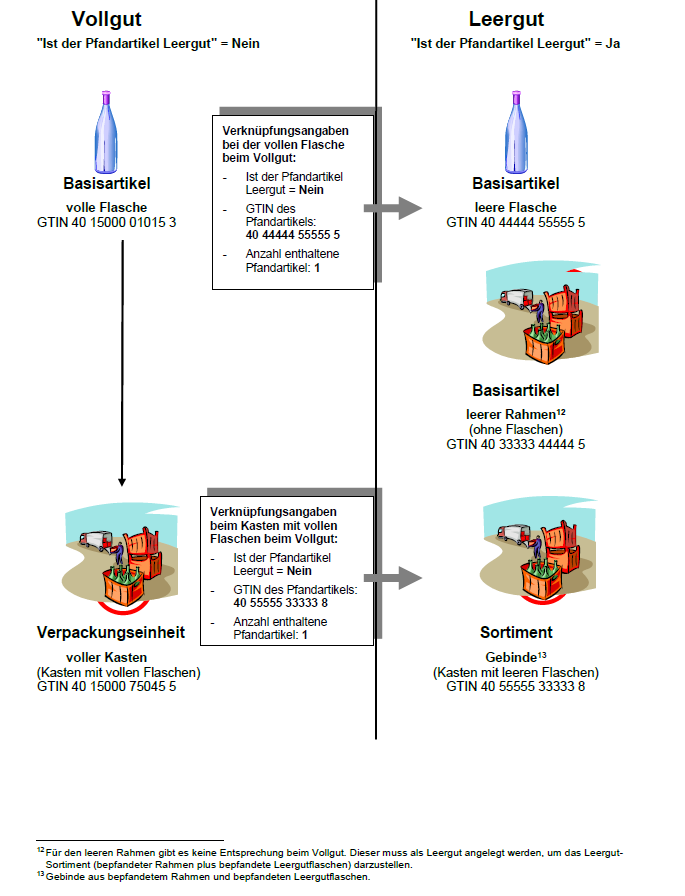
Mehr Informationen zum Thema Pfand finden Sie in unserem Kompendium im Kapitel „Pfandartikelinformationen“. Das Kompendium finden Sie in unserem Download Center.
Produktabbildungen und weitere digitale Anlagen
1. Was genau wird ab Februar 2023 verpflichtend?
2. Welche Produkte (Konsumenteneinheiten) sind von der Verpflichtung ausgenommen?
Kennzeichnung: Vertriebsart [M333] = (PRIVATE_LABEL) – Eigenmarke – Produziert nur für bestimmte(n) Empfänger-Handelspartner, dem/denen der Markenname (nicht die Rezeptur) gehört
Artikel mit besonderer Klassifizierung
Übersicht herunterladen (Excel-Datei)
3. Kann ich Produktabbildungen nur über das Digital Asset Management von atrify bereitstellen?
4. Wie groß muss die Produktabbildung sein?
5. Welches Dateiformat ist erforderlich?
6. Wir stellen bereits Bilder über atrify bereit. Muss ich die vorhandenen Bilder an den “neuen” Standard anpassen?
Die technische Prüfung wird jedoch nicht rückwirkend für bereits vorhandene Produktabbildungen durchgeführt.
7. Muss die Produktabbildung einen Beschneidungspfad haben?
8. Wird der GS1-Standard für die Dateibenennung “Datei: Name” eingeführt?
Beispiel:
04000001022397_C1C1_s01_v01
(s. GS1- Anwendungsempfehlung “Produktabbildungen und Media Assets”, ab S. 27)
9. Wird es eine Übergangsphase für die Bereitstellung von Produktabbildungen geben?
10. Wird in dem Attribut “Datei: Name” die Dateierweiterung (.jpg) auch eingepflegt?
11. Gibt es Beispiele für gute Produktabbildungen?
12. Wo finde ich umfassende Informationen zu dem Thema Bildverpflichtung 2023?
13. Gibt es eine Beispieldatei für korrekte Produktabbildungen?
Weitere Themen
1. Welche Leistungen umfasst der Customer Service der atrify GmbH ?
Support
Im Rahmen dieses Supports sind Test- und Produktionssysteme angesiedelt. Der Zweck des Supports ist es, die Funktionalität und Verfügbarkeit des jeweiligen Abonnementdienstes sicherzustellen, wie z.B. die Nutzung der atrify publishing UI und der Standardfunktionen, wie das Erstellen, Aktualisieren und Validieren von Artikeln.
Ad-hoc-Anpassungen, die von atrify auf Kundenwunsch implementiert werden, können im Rahmen eines separat abgeschlossenen Supportvertrages oder einer Leistungsbeschreibung unterstützt werden.
Technische Lösungen, die nicht von atrify implementiert werden, fallen nicht unter diesen Support.
Der Kunde muss bei einer Kontaktaufnahme mit dem Support von atrify relevante Informationen (wie GTIN, GLN usw.) angeben. Nachfolgend finden Sie Beispiele für den Umfang der Supportleistungen durch atrify, die jedoch nicht abschließend aufgezählt sind.
Umfang der Supportleistungen
1. Zugriff auf Systeme und Benutzerrechte: Probleme bei der Anmeldung (z.B. Anmeldung nicht möglich); Änderungen der Accountkonfiguration.
2. Datenvalidierung und -veröffentlichung: Probleme beim Erstellen oder Bearbeiten von Artikeln und Hierarchien oder nach deren Veröffentlichung; Exceptions, CICs, Systemwarnungen und Warnungen, die im Rahmen von Qualitätsverbesserungsinitiativen (z.B. Machine Learning und DQG-Initiativen) ausgelöst werden.
3. Excel: Probleme bei der Verwendung von aktualisierten atrify Excel-Vorlagen, die von den Systemen von atrify heruntergeladen wurden. Typische Beispiele sind:
- Probleme beim Hoch- und Herunterladen: Prozess kann nicht abgeschlossen werden.
- Fehlermeldungen nach dem Upload: Der Upload ist erfolgreich, aber mit Fehlern
4. Systemleistung: Unerwartete Systemreaktion beim Erstellen, Löschen oder Bearbeiten von Artikeln
5. B. sehr langsame Leistungen oder unterbrochene Sitzungen.
6. Allgemeines Wissen: Allgemeine Fragen zu Systemattributen, Prozessen und Best Practices.
Außerhalb des Umfangs der Supportleistungen
Die folgenden Themen gehören nicht zum Umfang der Supportleistung und müssen nach vertraglicher Vereinbarung der Parteien im Rahmen einer kostenpflichtigen Dienstleistung behandelt werden:
- Excel-Vorlagen, die veraltet sind, nicht von den Systemen von atrify heruntergeladen wurden oder deren Originalformat bearbeitet wurde.
- Fehler-Massenanalyse: Stattdessen können Probenanalyse und Best Practices bereitgestellt werden.
- Löschung von GTINs: Die Löschung wird nur in den Fällen vom Support-Team übernommen, in denen technische Probleme den Benutzer daran hindern, die Löschung selbst durchzuführen.
- Erstellung von Artikeln und Korrektur oder Pflege von Daten.
- Systeme, XML- oder FMCG-Schulungen, geplante Beratungsgespräche.
- Testen und/oder Einstellen von Ad-hoc-Szenarien auf Basis von Kundenanforderungen.
- Technische Probleme, die durch Hardwarefehler oder Systeme, die nicht von atrify stammen, verursacht werden
- Ad-hoc-Dokumentationen und Handbücher auf Kundenwunsch.
- Geschäftsbezogene Fragen.
–
Kontaktdaten des Supports
Bitte besuchen Sie uns im Internet unter: https://www.atrify.com/kontakt/ für aktuelle Kontaktdaten des Supports.
2. Wie erhalte ich eine Schulung oder ein Training?
Buchen Sie unser erweitertes Schulungs- und Workshopangebot jederzeit und von überall in unserem atrify Store: Schulungen und Trainings
In drei einfachen Schritten zur Wunschschulung:
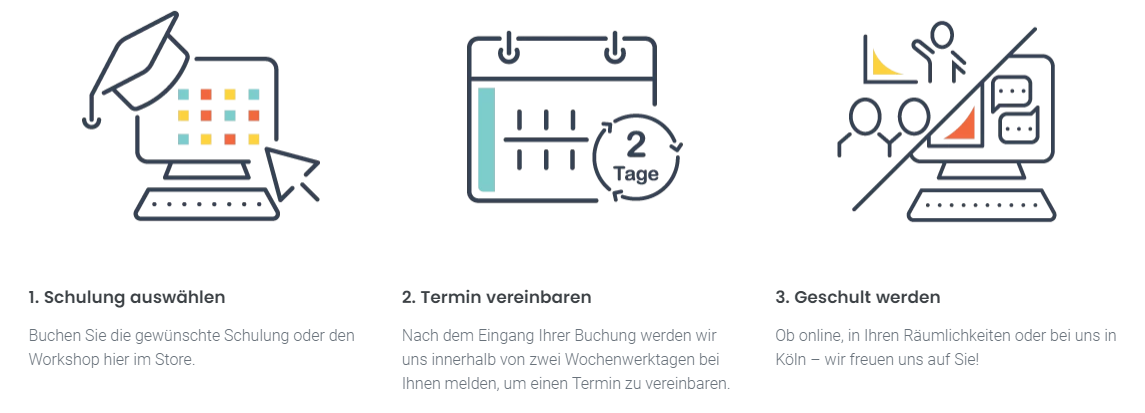
Falls Sie ein individuelles Training benötigen, welches im Store nicht aufgelistet ist, können Sie uns gerne über training-center@atrify.com anschreiben.
Für Nutzer der Händlerportale:
- Edeka: Schulungen für das Edeka Portal sind kostenlos und werden von atrify durchgeführt; kontaktieren Sie hierzu bitte training-center@atrify.com für weitere Informationen. Kosten trägt die EDEKA.
- Rewe: Schulungen für das Rewe Portal sind kostenlos und werden von atrify durchgeführt; kontaktieren Sie hierzu bitte training-center@atrify.com für weitere Informationen. Kosten trägt die Rewe Group.
- Metro: Schulungen für das Metro Portal sind kostenlos und werden von atrify durchgeführt; kontaktieren Sie hierzu bitte training-center@atrify.com für weitere Informationen. Kosten trägt die Metro Group.
User interface
1. Validate, Release, Publish - what do these different steps mean?

Validation of a data set is optional and validates the data to the current standard. It makes it possible to validate up to 100 items at once without having to open them one by one (see Tips & Tricks). This function is also available within the editor view, but the data validation is proactive here and is also started with the “Save” or “Release” function.
By activating the Release function, you send the data to our server (data pool). This means that the data is then basically ready and can be made available to the recipients. Please only release newly created hierarchies (!!) from the highest hierarchy level. If corrections have to be made on an item later, release it after the correction.
Through the Publication you determine who may receive the data. When you click on “Publish”, a window opens in which you have to select for whom the data is intended – for the “target market” (data is made publicly available within the GDSN network) or only for individual recipients? Please make the correct selection and publish the data. Upon receipt of the data, the recipients will send you a message that you can view under “Recipient Feedback (CICs)”. Always publish only the highest hierarchical item. After an update of the data, an item does not have to be republished, just released again.
2. How can I search for attributes?
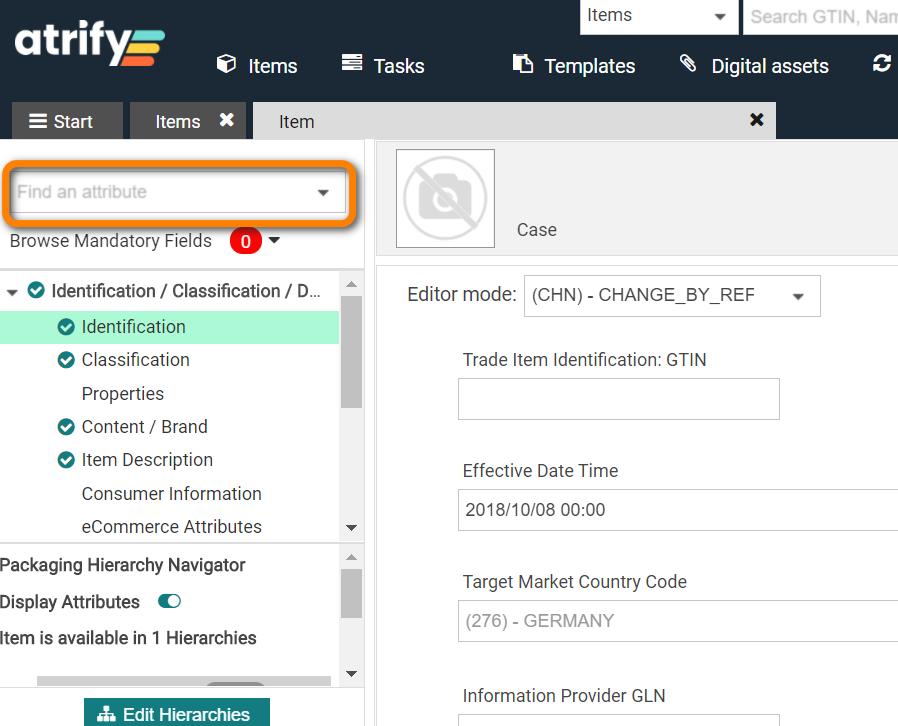
Type the attribute’s name or a part of it within the dropdown.
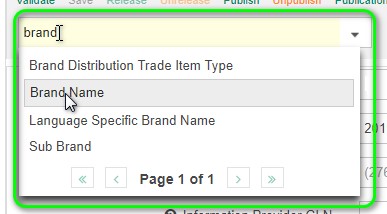
A dropdown list will open and by choosing an attribute you will be directed automatically to the corresponding item editor field. The attribute is highlighted then.
Please note that the search will find only individual attributes, but no attributes which are part of attribute groups. In this case you need to search for the group name, pick it and you will be directed to the attribute group.
Alternatively, you can simply browse the dropdown menu and pick the appropriate attribute.
3. Can I change the table view in the item overview?
Yes, you can edit the layout of the table columns in your item overview. For example, if you want to change the column „File: Thumbnail“ with the product images, you can easily move or remove the column by using the „Edit table columns“
1. Go to your item overview and click on „Edit view“. A new window opens in which all available table columns are listed.
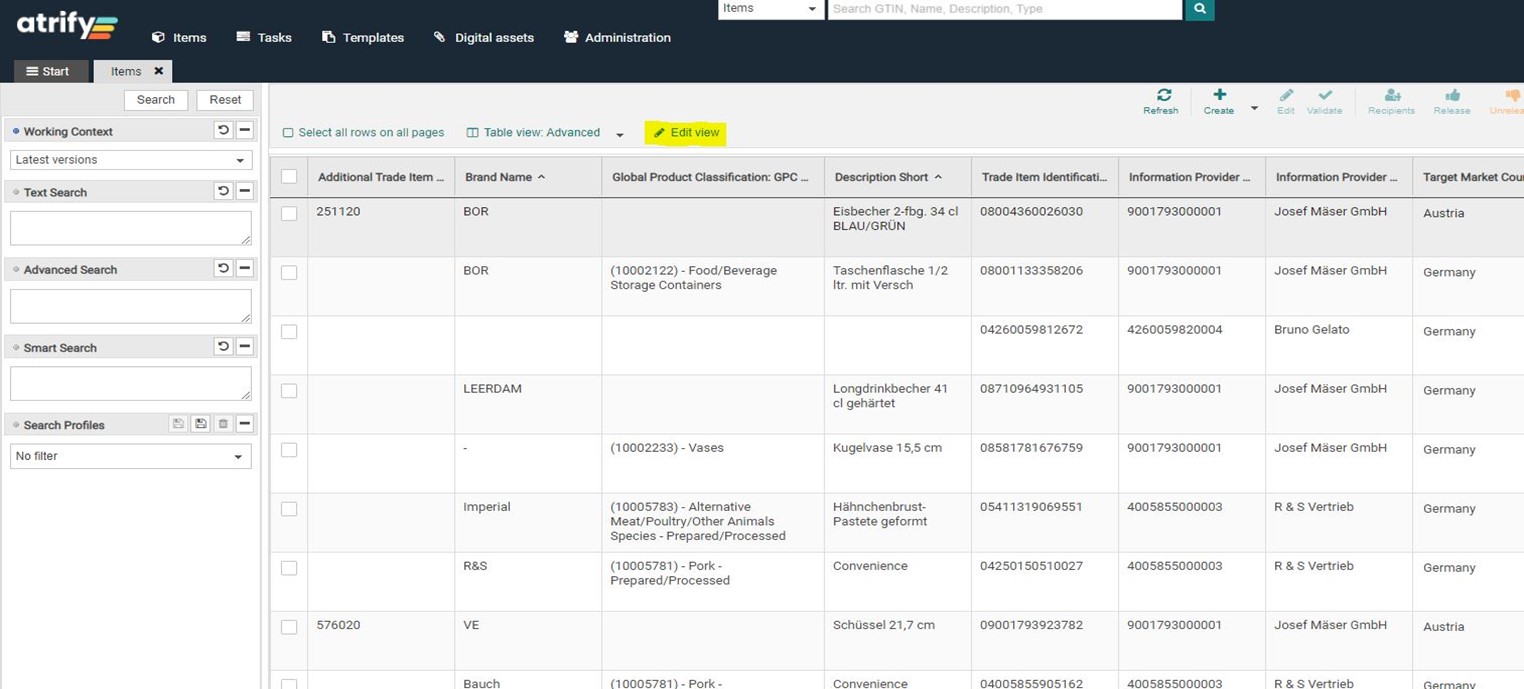
2. In this window you can now edit the columns of the table as you wish.
a) You can change the order of the columns by clicking on the column and simply dragging the mouse up and down to the desired position.
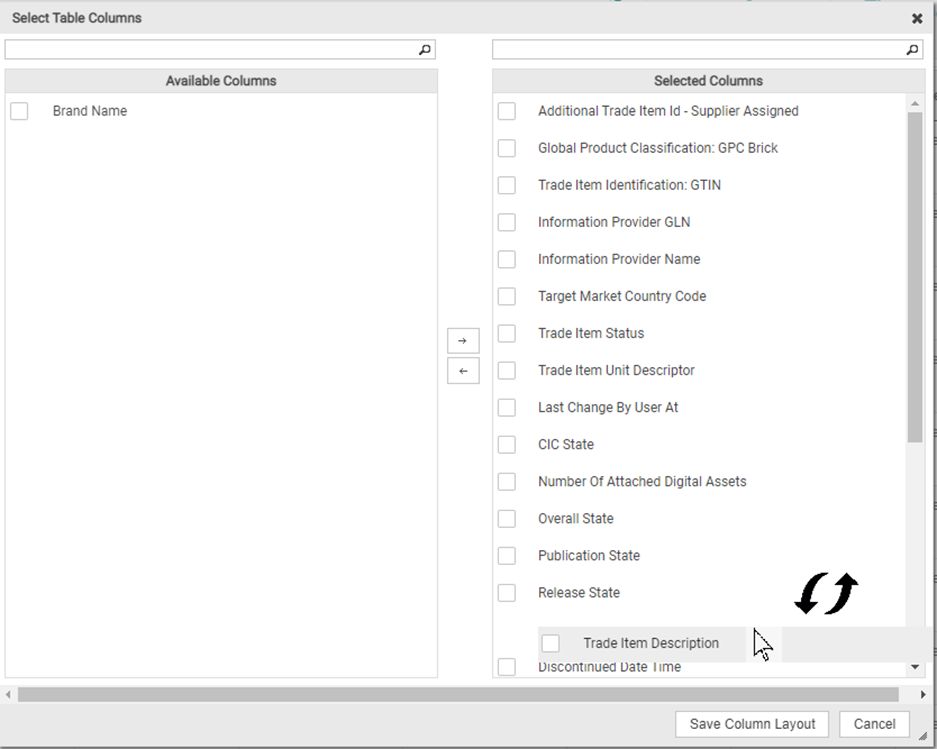
b) You can remove columns by selecting them and clicking on the „move left“ button.
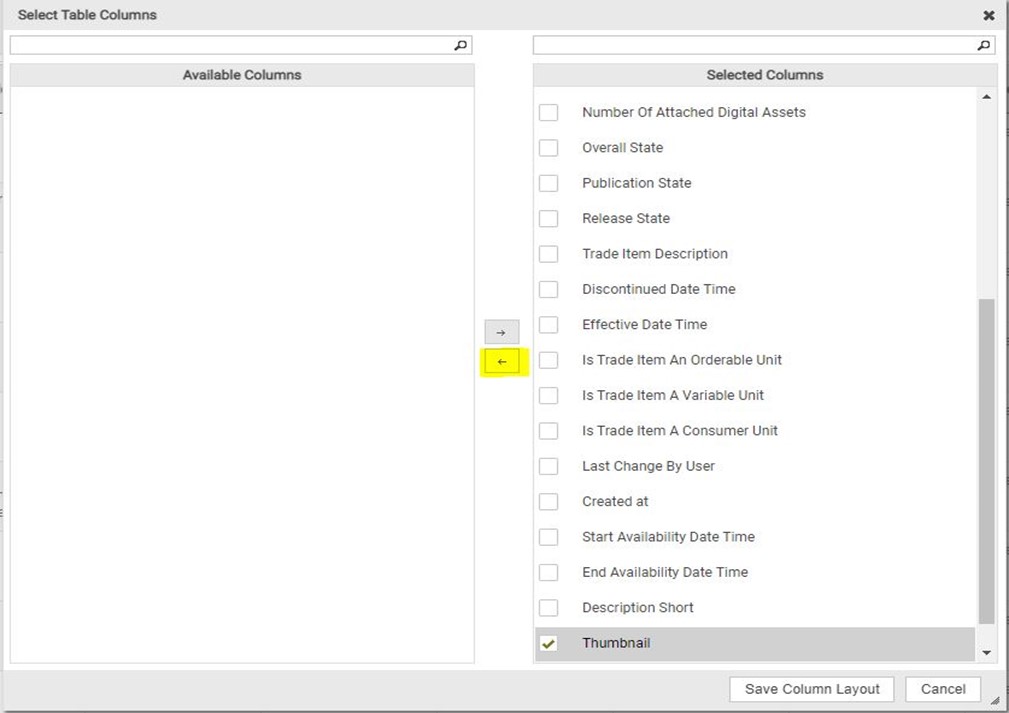
The selected column is then moved to the „Available columns“ area and is no longer available in the table.
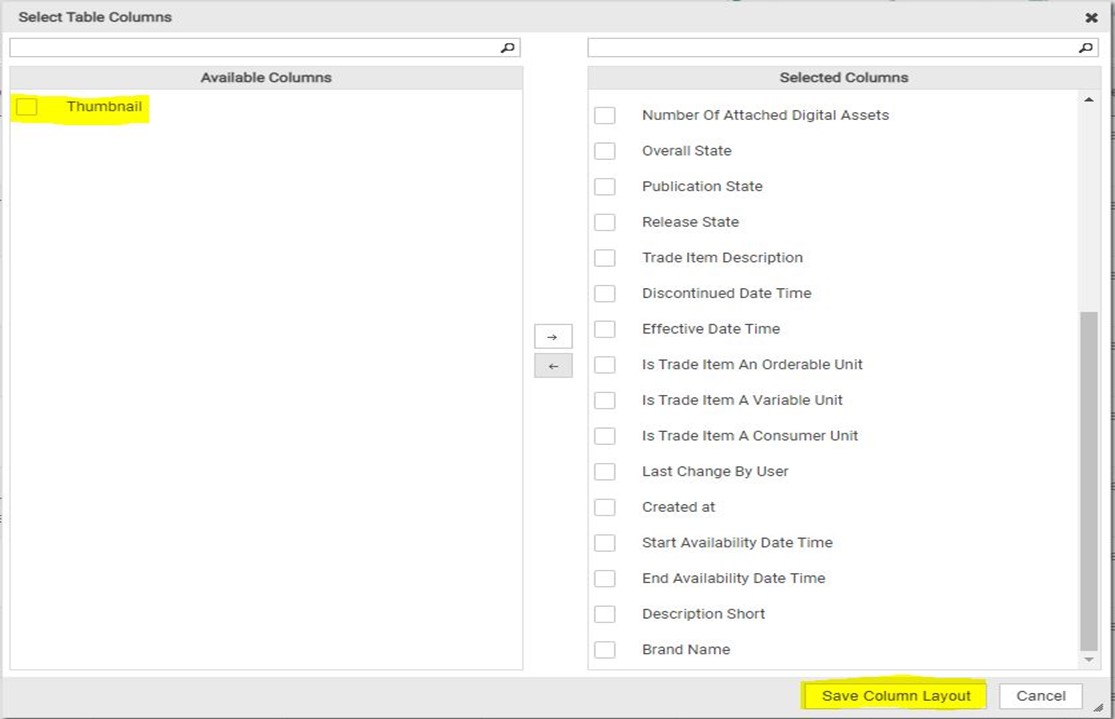
When you have finished editing, click on „Save Column Layout“ and the window will close. The table columns have now been adjusted to your requirements.
4. How can I filter my items?
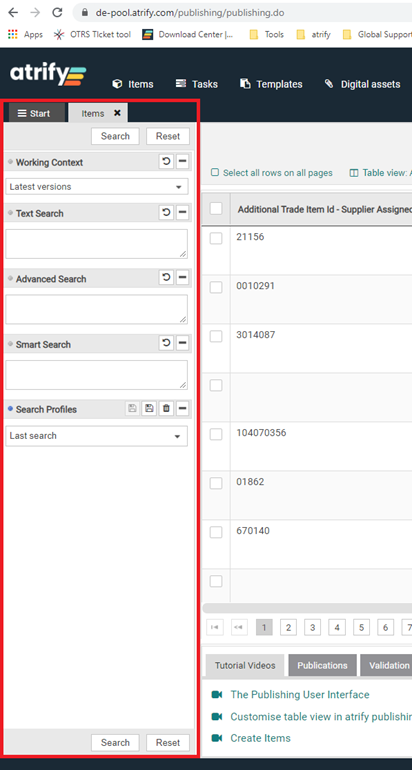
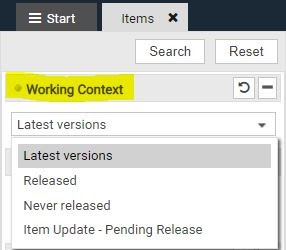
With the Working context you can restrict your items to a certain status:
Into the text search you can enter one or more search terms such as GTIN’s (up to 900 simultaneously) or keywords, and by clicking on „Search“ your hit list will be limited to the corresponding ones:

In general, the text search can be limited by using wildcards and logical operators, e.g. [], *, [*], [+].
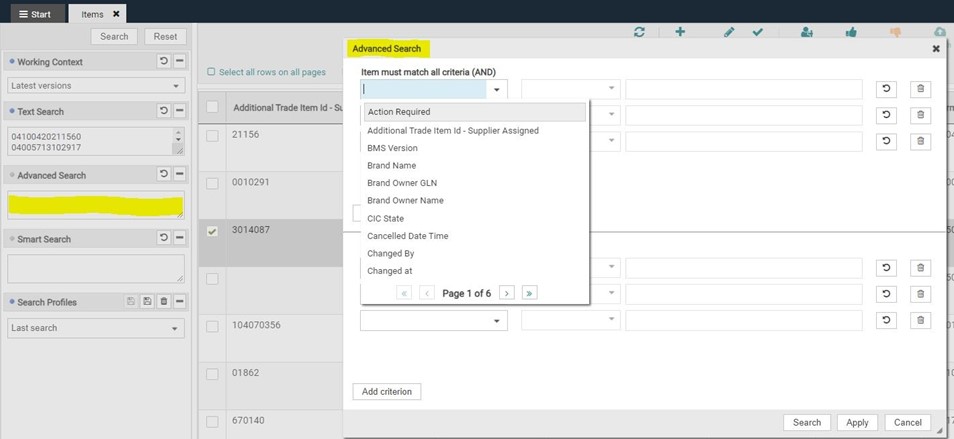
With the Advanced search you can filter your items by specific attributes such as Brand Name, CIC State, Target market country code, etc. To use these filters, click on the empty box under Advanced search as seen highlighted on the picture below and it will open a new window. Here you can define the search criteria according to your preferences. Once you have finished defining the search criteria, click either on “Search” (and the search is performed directly) or “Apply” (the search criteria are applied but the search is not yet performed).
You can use the smart search to filter your items according to certain properties such as publication status, GPC classification, CIC status, etc. To use these filters, click on the empty box under “Smart Search” as seen below and a new window opens in which you can define the search criteria.
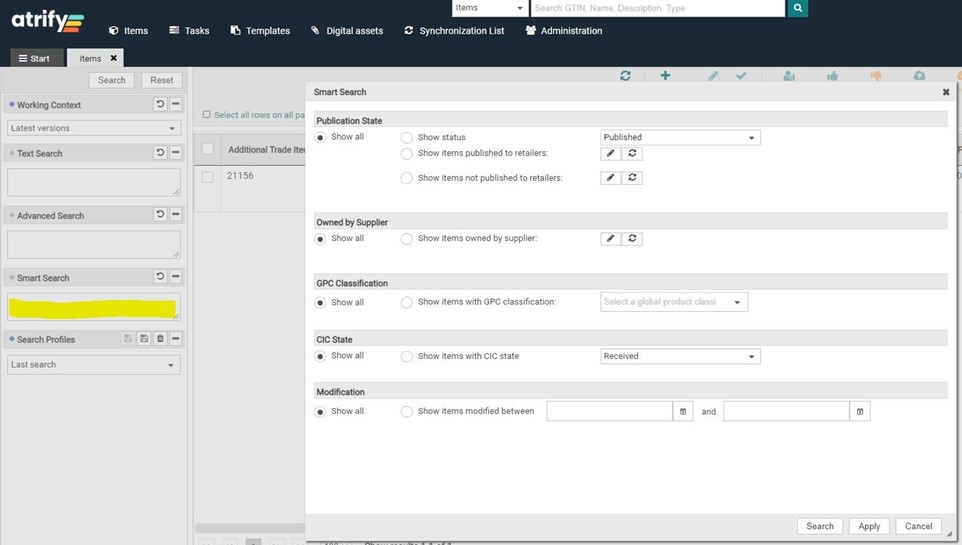
Once you have finished defining the search criteria, click either on “Search” (and the search is performed directly) or “Apply” (the search criteria are applied but the search is not yet performed).
In general, all filters can be combined, but the combination must be logical and the criteria must not be mutually exclusive.
It is also possible to save the search settings. Proceed as follows:
- Define the desired search settings
- In the filter section, click on the “Save”
- In the new dialog box, enter a name for the filter profile and click on “Save”
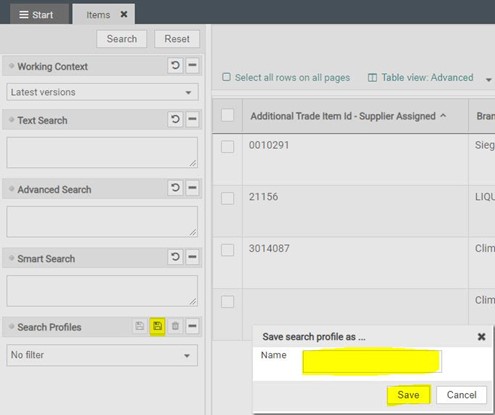
More details about the different filters can be found in our publishing manual in chapter “Selection and component search”. You can find the manual in our Download Center.
5. Where can I change my password?
Please click on your username in the right upper corner and then choose “Change Password”:
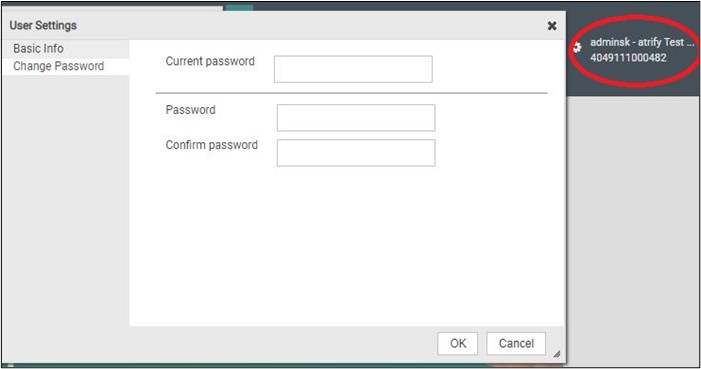
The current password is the one you used to log in. If you change the password, you have to use the new one with the next login. The current session will remain in place for now.
Please note that the password must be at least 5 characters long, contain upper and lower case letters as well as numbers and must not be a combination of the user name or name of the user.
To change the language and/or time zone please click on “Basic Info”:
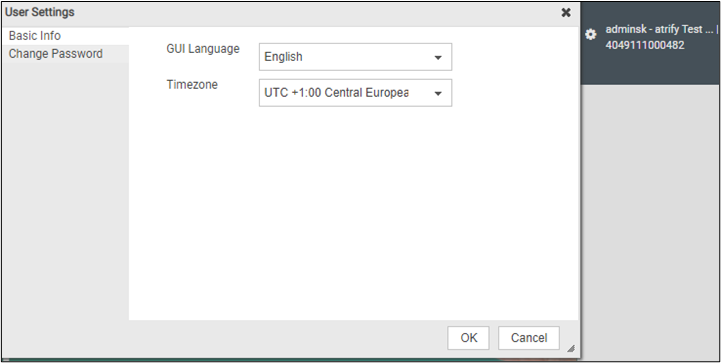
6. How can I create additional users?
They need your GLN and/or Company name, the name of the user and the email address to create new users for you.
You also have the possibility to get Admin rights if you want to administrate the users for your company by yourself.
7. I need an overview of several items, but only regarding some attributes. Can I create such a report?
To do this, in the items overview in your publishing UI, select all items that have to appear in the overview, and then click on “Download” at the top right and select “CSV report”.
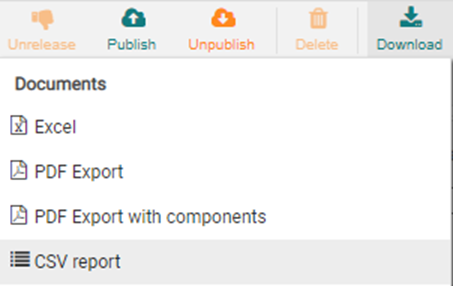
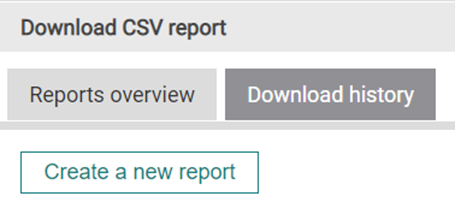
In continuation click on “Create a new report”.
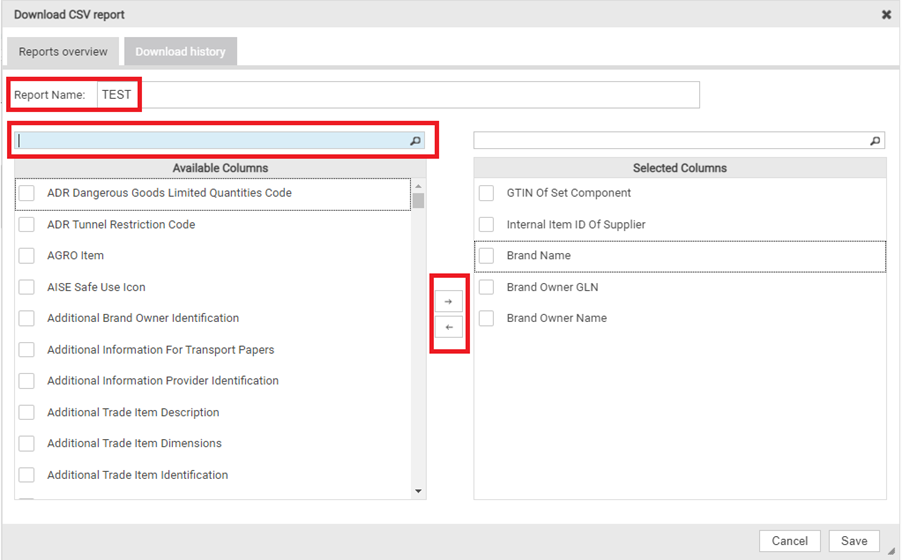
Under ‘’Available Columns’’ are the attributes. In order to have them in the report, you have to select and move them with the button in the middle to the ‘’Selected Columns’’ or simply drag and drop each attribute.
Note that you can also change the order of the attributes in the right-hand column by moving the attribute above or under another, depending on what order you want to have them in your report.
Please be sure to insert a name within ‘’Report Name’’ as you will not be able to save the CSV without naming it.
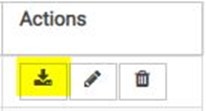
When you have moved all necessary attributes to the right, then click on “Save”. Now you can download the report via the download icon as seen on the first screenshot.
Please note that the report appears in CSV format. You usually need to edit the format to make the report clear and user-friendly. Therefore, please find out how you can best set the file for your preferred file format (e.g. Excel) and be aware that this service is out of the scope of the atrify support.
Error handling
1. Orange dots. What do they mean?
The validation rules that are shown here are DQG warnings. These appear as orange dots next to supposedly incorrect attributes or as warnings with the addition “DQG” in the validation report.

More information about the DQG project can be found under the following link: https://www.gs1-germany.de/gs1-solutions/stammdaten/data-quality-gate/
2. Why is the GTIN not accepted?
- Only 14-digit GTINs are accepted by the system
- If your GTIN has 13 digits, enter a zero before the first digit.
- If your GTIN consists of less than 13 digits, enter as many zeros as needed before the first digit to reach 14 digits.
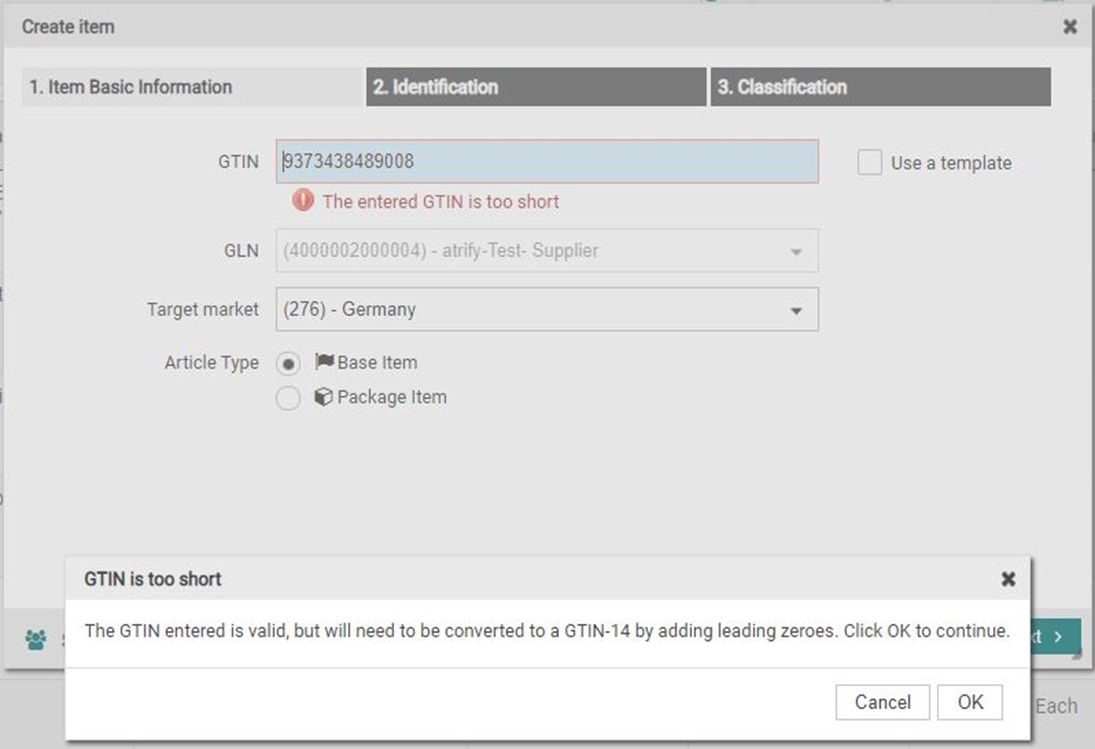
For example GTIN 9373438489008 must be replaced by GTIN 09373438489008.
-
- Possibly the check-digit (last digit of GTIN) was not calculated correctly. You can easily check or calculate this with the check-digit calculator: https://www.gs1.org/services/check-digit-calculator
3. What does the error message "no order unit" mean?
You receive the following error message: “GDSN Numeric Rule ID 312: Within an item hierarchy, at least one item must be marked as “Order unit” = “True” because in a hierarchy at least one component must be declared as an orderable unit.
Requirements:
The publication should always be made from the highest level of the hierarchy; e.g. in this hierarchy:
- Pallet
- Packaging (case, display, etc.)
- Base item
The pallet has to be published. The pallet is displayed with status “published”; all components in the hierarchy are displayed with status “item sent”.
If the configuration within the hierarchy is correct, but you still get this error message, please check the following:
- Have you possibly published the base item in addition to the packaging? Please note that only the highest hierarchy level should be published, otherwise it may cause technical problems. If necessary, cancel the publication of the base item(s) and leave only the highest hierarchy level published.
- Close the item , refresh the item via the “refresh” button and open it again.
- If the above points do not apply, please try the following:
- open the highest hierarchy level of the item(e.g.: the pallet or case)
- make a fake correction by changing the time in the field “Availability: Start date (time)” by 1 minute
- save the change
- now try to release the hierarchy
If the above mentioned points do not work, please contact customer support: support@atrify.com
4. System message "anomaly": what do I do?
For additional assistance within the atrify Publishing, a number of new functions will be implemented step by step. Digital intelligence and complex algorithms thus enable an innovative service based on the data in the data pool.
The goal is to uncover possible deviations (anomalies) in the data at an early stage, so that items are created correctly from the beginning and typing errors are avoided or untypical information can be recognized.
The first validations were installed in the publishing system with Release 6.7 and calculate values for product density based on the weight and dimension specifications. The system then compares these values with all items in the data pool that have the same GPC code. If the entries deviate too much from the mean value of the data analysis, you will receive a corresponding message in the system.
How does it work?
- after you have created and saved an item or modified an existing item, click on „Validate“

- on the basis of the dimensions and weight, the system calculates a value for the product density
- this product density is compared with the values of other items with the same GPC code to identify atypical indications
- in case of discrepancies, a message marked as an anomaly appears, as in the following example:
![]()
Where do I find the notification of discrepancies?
The system provides information on this in two different places:
- when you open the item, you will see orange dots to the left of the menu items with anomalies
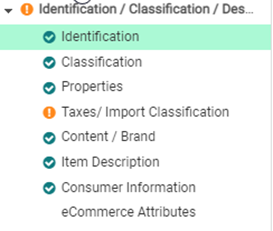
What do I have to do?
Anomaly notifications are notices that do not prevent release and publication. The notifications are generated based on a comparative analysis with other items of the same GPC classification, but may not apply to your items.
If the notification indicates actual errors, you can correct them; if your information is correct, you can ignore the notifications.
Example:
A milk pudding measuring 210 x 142 x 369 mm and a gross weight of 2,185 kg. This is probably where intelligent data analysis will come in because the weight is too high. Probably the unit of measurement will have to be changed from kilogram to gram.
5. Why do I suddenly get a red bullet icon in the tax/import information section?
With one of the latest releases, new validation rules for import classification for the target market Germany became active. In the system, these are displayed as red icons next to supposedly incorrect attributes.
![]()
In our current compendium you will find further details on this from page 262 onwards (available only in German). You can download the compendium free of charge from the Download Center on our website:
https://www.atrify.com/en/kundenbereich/download-center/
Please make sure that you always download the latest version of the compendium, because with every release the compendium is updated.
Further information on the subject of customs tariff numbers can also be found on these websites:
English: http://www.tariffnumber.com/
Deutsch: http://www.zolltarifnummern.de/
Francais: http://www.tarifdouanier.eu/
If you have not yet filled in the attributes “Import Classification: Value” and “Import Classification: Type” for your items, please inform yourself within your company which values have to be entered; please note that, out of legal reasons, the support is not entitled to tell you how to fill in the fields. Every supplier should be informed about the import classification for his/her products; please refer to the personnel in charge of this within your company.
Please inform yourself internally about the quantity to be entered in these fields as well.
Some useful information on this topic can be found on the website of the Federal Statistical Office under this link: https://www.destatis.de/DE/Methoden/Klassifikationen/Aussenhandel/sova-leitdatei.html
In the zip file „Liste der gültigen Warennummern (Sova Leitdatei) Ausgabe 2019“ (from 01.04.2019)
Please inform yourself internally about the quantity to be entered in these fields as well.
Some useful information on this topic can be found on the website of the Federal Statistical Office under this link: https://www.destatis.de/DE/Methoden/Klassifikationen/Aussenhandel/sova-leitdatei.html
In der Zip Datei „Liste der gültigen Warennummern (Sova Leitdatei) Ausgabe 2019“ (Stand 01.04.2019)

Please note that, out of legal reasons, the Support is not entitled to tell you which values to enter.
6. Why can the recipients not see my item?
There are several reasons why the items are not visible:
- only successfully published hierarchies (green check mark) are visible to the recipients. Items with the status “Draft” or “Released” are not yet visible to the recipients.
- First of all, please check whether the items have either been published or sent as part of a published hierarchy level (status: item sent)
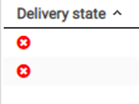
These two examples show that these items have not reached the recipient as they aren’t published yet. Please release these items (if needed) or publish them.


The next two examples show that the items are correctly published to the recipients. The first is part of a hierarchy where the top item has been published, the second is a simple base item that has been published. You can see the double green checkmark if it reaches the recipient.


In addition, check whether you have received an exception from the data pool that indicates whether your hierarchy was not accepted by the data pool due to an error. If you do not understand the exception, please contact Customer Support: support@atrify.com
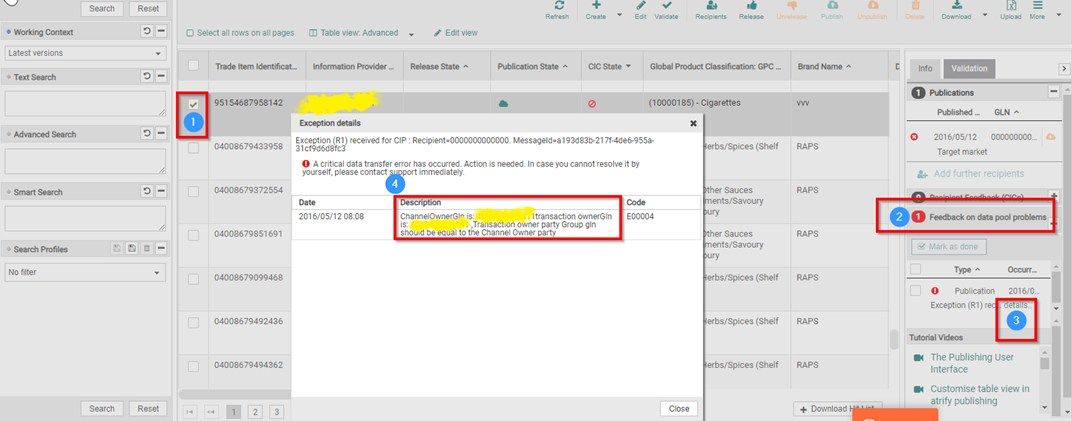
- the data was published to the wrong recipient, e.g. only to the Data Quality Gate.
Please first check where the data has been published and if necessary publish the data to the correct recipient.
- the GTINs were published correctly, but there is no subscription between your company and the recipients; a “subscription” is a technical setting that allows the respective recipients to receive your data.
Please contact your contact person (recipient) and ask him/her to check whether a subscription has been set up.
- Occasionally it can happen that there is a general delay in the system; data can be sent after a few hours and occasionally even later. Please note: Items published to the entire target market are delivered later than data published to specific GLNs only. Various reasons can also delay publication: system overload or other technical reasons. Please contact the support if there is a significant delay: support@atrify.com
Editing of items
1. How can I withdraw a publication with Excel?
or if you wish to cancel the publication of numerous items at once, please download the item(s) in Excel.
To do this, first, you need to select the items(s) in the item overview, then click on “Download” and from the drop down menu you choose “Excel”, as seen on the below picture.

After choosing ‘’Excel’’ a new window opens. Click on ‘’Start Download’’:

After downloading open the Excel and on the last sheet called “Publishing” change the ActionCode from ‘’ADD’’ to ‘’DEL’’.
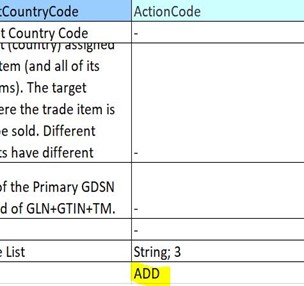
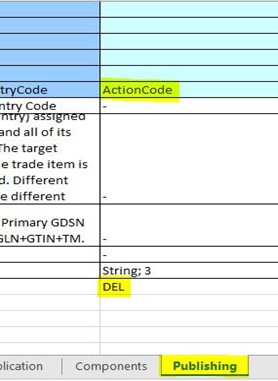
After performing these changes, save the document and upload it by clicking “Upload” at the top right corner of the Publishing UI as shown below.

Hence, a new window will open. Further, click on “+ Select” and select your Excel file. After Selecting the file, the ‘’Start Upload’’ button will be activated which will allow you to upload the file.
By checking the box “Release uploaded items”, you can release the item directly not having to do it manually afterwards.
Now click on “Start upload”. As soon as the column says “State – success”, the upload is complete and you can close the window.
2. How can I change the item type, e.g. convert a base item into a packaging item?
Please open the item and check the attribute “base item”. There you should find“(false) – No”
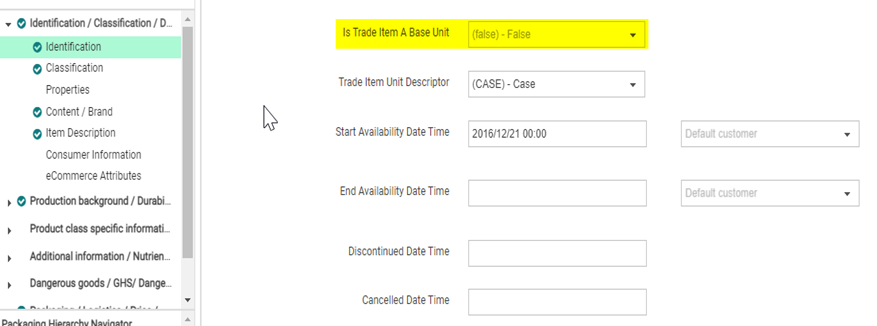
If it says „(true) – Yes”, then the item was created as a base item and therefore cannot be linked to another base item. It is not possible to change the attribute base item (Yes/No), which is set when selecting the item type (packaging/base item); it is only possible to delete and create again the wrong item. To do so, please follow the steps below:
Part I – Withdrawal of publication
- Undo the publication by clicking on “Undo publication” – if the button is not active, first release the item and wait until the release has arrived, then click on “Undo publication”
- Cancel the release by “Unrelease”
Part II – Save item as a template, delete & create new
- Open the incorrectly created item
- Save the item as a template:
- Click on the button “Save as template”
- A new window opens – give the template a name; the remaining entries are taken over
- It is best to select “Packaging” directly under “item type”
- Click on “Next” and check the prefilled entries and then click on “Create”
- Click on “Save” so that the information is not lost


- Close the template and go to the item overview
- Find the incorrectly created item that you want to delete
- Click on the item 1x to select it
- Click on „delete”

- Create the item again, with the same GTIN and so that you do not have to enter all data again, use the template
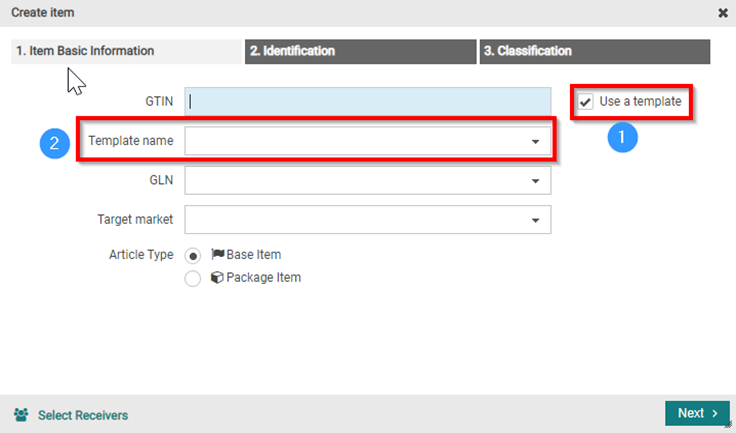
- Please make sure that you tick the correct check-box under “Type of item”
- Please check all entries in the item carefully and fill in any mandatory fields
Part III – Connecting packaging items to the base items
- Connect the packaging to the base item. You will find detailed instructions in the FAQ: “How do I attach packaging to base items?”
- Click on Share – Share Hierarchies & Publish the hierarchy. Please click on release and publish always only from the highest hierarchy level. It is NOT necessary to publish all items of a hierarchy.
3. How can I delete an item?
Exception: The item was created incorrectly and the GTIN will be used again (e.g. you created your case item as base item and now you want to change the item type). In this case please follow step 1 to 3 from “Deletion (physical deletion) from Publishing Tool”.
Preparation:
- Items which are published or used to be published must be in a released and published state or be part of a published hierarchy. Invalid items must be corrected and released first. This has to be done separately from the logical deletion process. Please correct any errors first and afterwards follow the steps from the logical deletion process.
- If a publication has already been withdrawn, please publish the item again and do not start the logical deletion process until the publication has arrived.
- Please analyze your hierarchies – which item(s) do you want to delete? Does your base item still exists and you only want to delete the case item or do you want to delete the whole hierarchy?
Logical deletion process (deregister items)
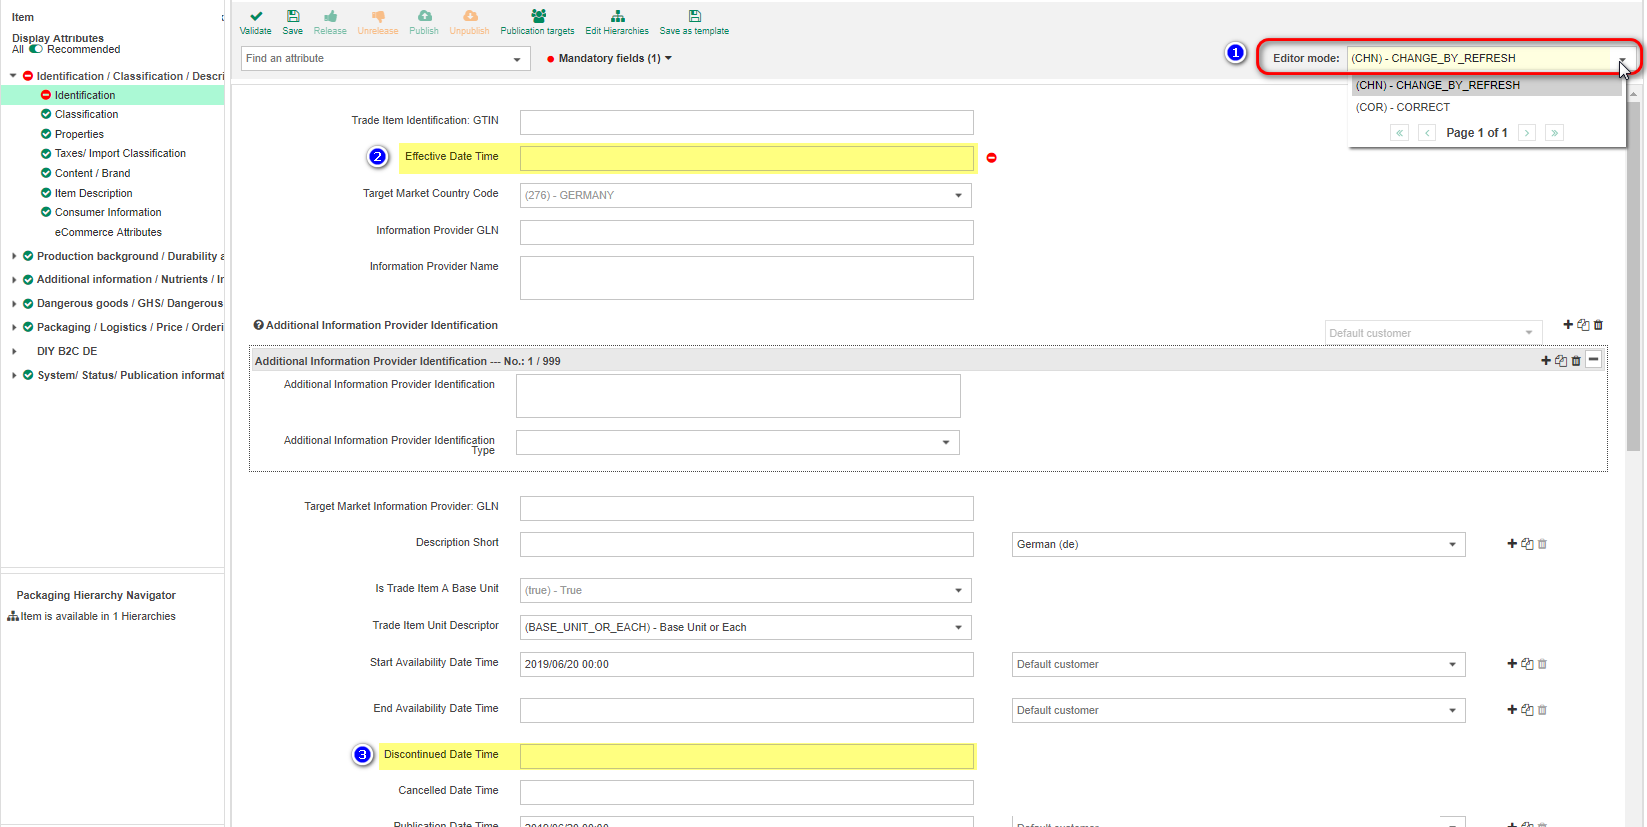
- Change the attribute “Editor Mode” to “(CHN) – CHANGE_BY_REFRESH”
- Set a current “Effective Date Time”
- Set a “Discontinued Date Time”
- Save and release the item
- Wait until the release has arrived in the retailer tools (atrify Approval). You can check this by closing and reopening the item. Now click on the plus next to “Publications” to check the delivery state. First you will see a paper plane, which means the release is on the way, but has not yet arrived.

Close the item and wait for a while. Reopen the item and wait until the paper plane becomes a green tick, which means that your publication was successful.

Note: You can also check the delivery state in your item overview in the lower section. Select the published item and click on the tab called “Publications” in the lower part of the screen.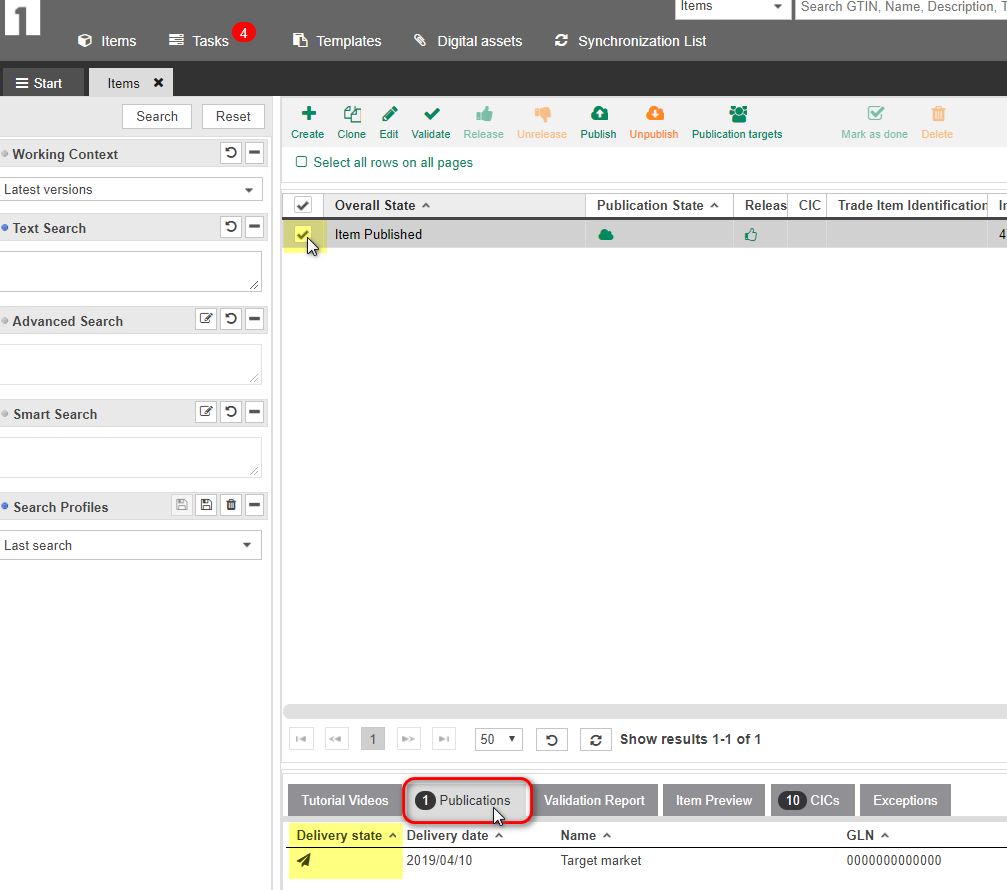
6. Unpublish the item.
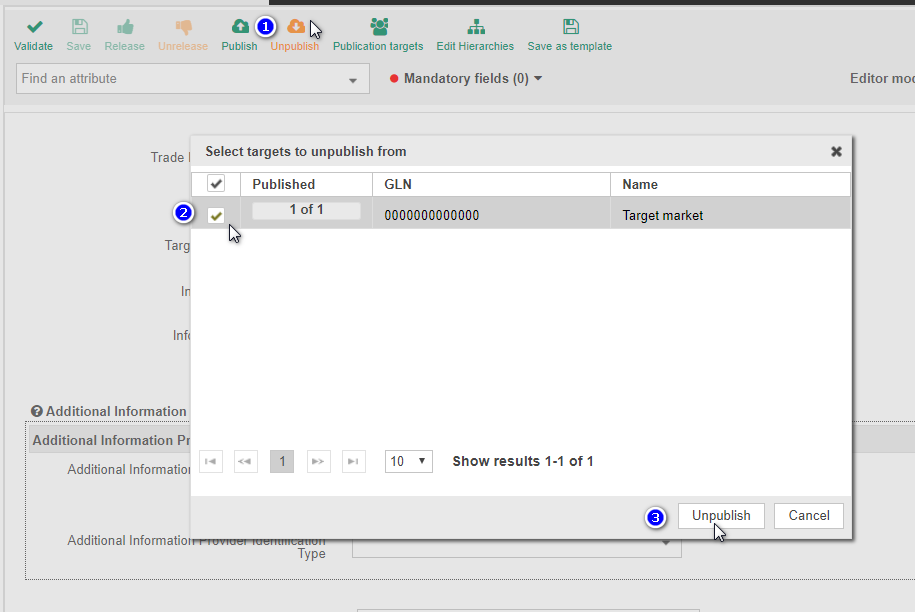
Notes: If a base item has to be deleted, the unmixed pallet or unmixed case must also be deleted. In this case please enter in all hierarchy-levels a “Discontinued Date Time” and release the hierarchy from the top level.
If a base item is a component of a range (e.g. display), you should consider whether the whole assortment needs to be deleted or just one item. The replacement of components is not permitted. For further details on this topic please read the GTIN rules https://www.gs1.org/1/gtinrules/index.php//en/ and / or discuss this with the recipient(s).
If you only want to delete the case item, you enter the “Discontinued Date Time” only for the relevant packaging GTIN.
If you maintained the “Discontinued Date” a long time ago but you did not release the item with the “Editor mode: (CHN) – CHANGE_BY_REFRESH” and you are now being asked by the retailers to unsubscribe the item correctly, choose a “Effective Date” in the past but only so far that it does not exceed 6 months from the already registered expiry date. Leave the “Discontinued Date” untouched.
Delete (physical deletion) from the publishing:
As already mentioned above, by performing the physical deletion process you only delete items in the publishing tool. Nevertheless, the items will still remain with the latest status on the server (DSE) and in the retailer catalogues. If you physically delete an item, you lose control of it and not even the Support can restore them. You may need to re-create the item, therefore you should make sure that you want to physically delete an item from publishing. In any case, you should be absolutely sure that the item has been correctly unsubscribed from the retailer catalogues (please check logical deletion process).
- Unpublish your item – if not already done. Wait until the entries disappear in the publication window.
- Switch to the base item and unrelease it (for the whole hierarchy). If the base item is still active in another hierarchy, you have to unrelease the item via the case item which you want to delete.
- Mark the corresponding item in your item overview. The button “delete” is now active. Click on it and the item will be deleted.
Note: To delete an item that is part of multiple hierarchies, all publications of these hierarchies must be revoked as well. Do not separate the hierarchies. The item separates itself from the hierarchy when deleting itself.
4. How can I change a hierarchy?
to the video
If the item has not been published yet, this training video explains how to edit hierarchies in atrify publishing: to the video
5. How do I combine packaging with base items?
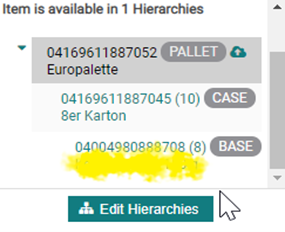
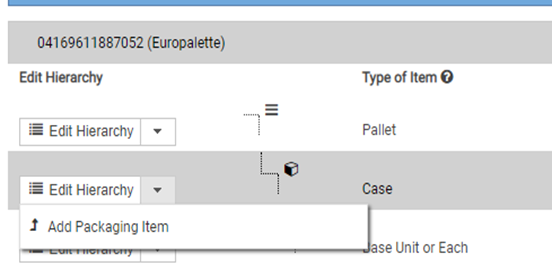
You can then link the packaging to other items under “Edit Hierarchies”. If you want to append the base item, choose “Add Packaging Item”.
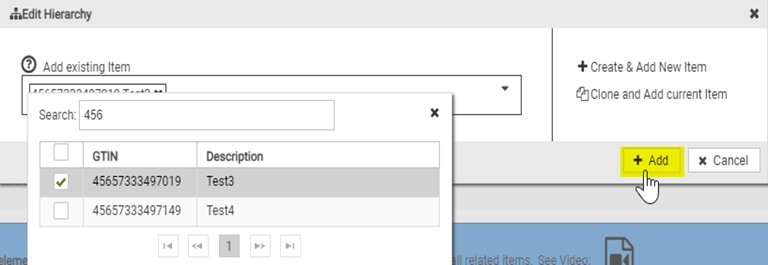
Then search for the GTIN of the base item, mark it and click on „Add“.
Now you still have to specify how often the basic item is included in the packaging.

You can also add various base items to a package. Simply repeat the procedure described above. Proceed in the same way when you create a display or a pallet, for example.
Tip: Also take a look at our training video on this topic: to the video
6. Do I have to withdraw the publication in case of corrections?
That depends on what needs to be corrected. If you only need to make a change or correction within the data record of a unit, the publication status remains unaffected. In this case, simply correct the data, save and release again. The recipients will then receive your data without having to publish again.
However, editing a hierarchy requires that the data is not published and not released. If, for example, you need to change the number of base items in the packaging or add a hierarchy component to a published hierarchy, you must first cancel the publication and release of the hierarchy see also FAQ: How can I change a hierarchy?
To avoid errors that are difficult to correct during data transmission, it is particularly important that you observe the necessary waiting times. If you clicked on „Unpublish“ , you have merely initiated the process of undoing the publication. Where previously there were green checkmarks in the publication field, paper flyers are now visible. Only when the field is empty and the wording “No publications” appears there is no longer a published record.
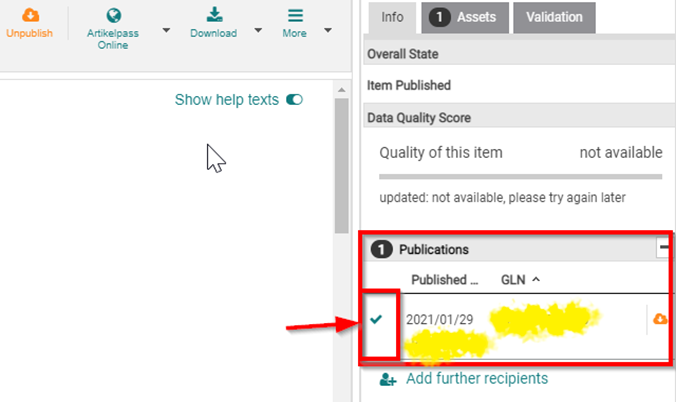
You can then revoke the release and make the desired changes.
Even after you have (re)released a data record, you should first wait to see whether exceptions occur and not publish them immediately. If no exceptions occur after 1-2 hours, you can usually publish the data.
7. "Correction" or "Change by refresh"?
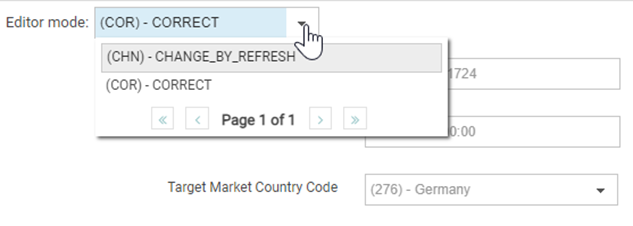
(COR) – Correction: This setting is selected if you want to correct incorrect information or add further information.
(CHN) – Change by refresh: This setting is selected if something changes in the real product or in the logistical unit, or if an event (e.g. deletion) is announced.
Since the GTIN is intended to guarantee a clear identification of a product or a logistical unit, the question arises as to the extent to which an item can be changed in order to continue to be considered the same item. This is determined by the GTIN allocation rules:
https://www.gs1.org/1/gtinrules/index.php//en/
The allocation rules are, as far as possible, also implemented in publishing, but a supplier should be familiar with these rules in order to be able to choose between a permissible change or the allocation of a new GTIN in advance (when planning product changes).
Important: If both a correction and a change are pending when a data record is updated, the update must be carried out in 2 steps.
Example:
In the case of a case that is to be deleted, the gross weight is incorrect with regard to its contents:
- (COR) – Correction: Correction of the gross weight -> Save -> Release
- (CHN) – Change: New valid from date, expiry date -> Save-> Release. (See also in our FAQ under 3. How can I delete an item?)
If the gross weight were to be corrected in step 2, the allocation rule might apply that weights and dimensions may only change by up to 20%.
8. How long does it take to deliver the data to the recipient?
You can check the status of the publication using the delivery status. To do this, open the item and click on the plus sign next to “Publications” on the right side of the screen.
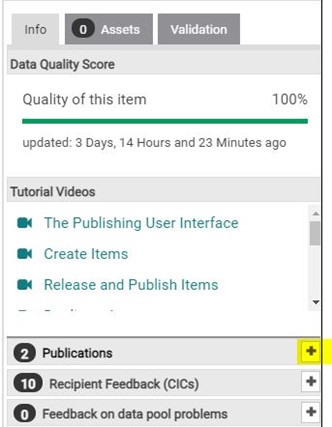
There you will first see a paper airplane, which means that the publication is on its way but has not yet been arrived.
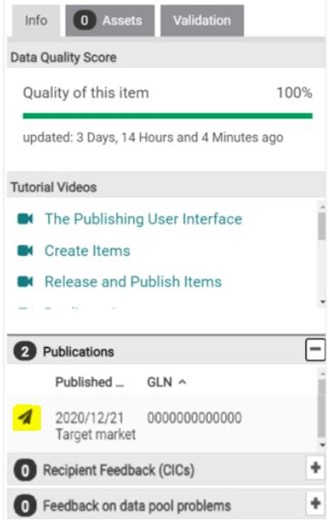
Close the item again and wait for a while. If you then see a green check mark under ‘’Publications’’, your publication was successful.
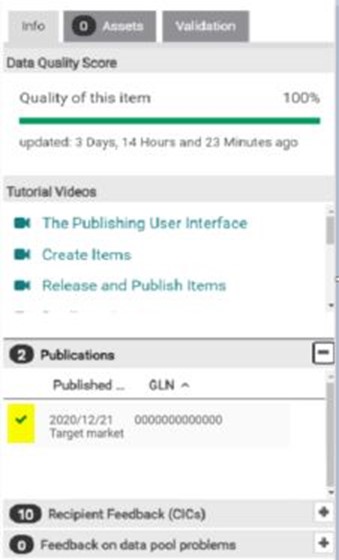
In addition, you can also check the delivery status in your item overview in the lower part of the screen.
To do this, select the published item and click on “Publications” in the lower screen area.

If your publication is significantly delayed, please check your publication under this aspect: Error handling → Why can’t the recipients see my items?
9. How do I create a deposit?
For the Target Market Germany, deposit-paid one-way and reusable packaging can be created while for the target market Austria you can create deposit-paid reusable packaging.
In the following section, we will provide you an example to explain how to create deposit items. Please note that the following GTIN’s and specifications are only examples and you will have to adapt the information accordingly for your product.
To create this construct, you need a total of 5 GTINs, which are linked in 2 different hierarchies:
I. Hierarchy = empty crate consisting of: empty bottles + empty frame
- GTIN (e.g. 040444445555) for the empty bottle: create as base item
- GTIN (e.g. 04033333444445) for the empty crate (or frame) without bottles: create as a base item
- GTIN (e.g. 04055555333338) for the creation of a display: create as packaging (a display consisting of one empty bottle + empty crate or frame is created)
In the “Classification” section you can select Storage – / Transport container (92000000)
Example: Product classification returnable bottle
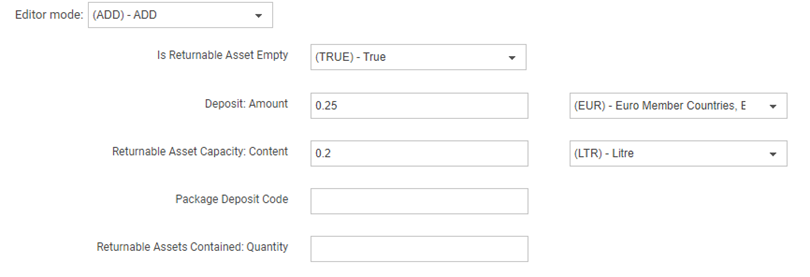
In the area “Packaging / Logistics / Price / Order / Deposit items” under “Deposit items” you should enter the following configuration:
- Is Returnable Asset Emtpy: (TRUE) – Yes
- Deposit amount: enter the numeric value here
- Deposit amount: Currency: e.g. (EUR) – European Euro
- Returnable Asset Capacity: Content: e.g. 1
- Returnable Asset Capacity: Conten Unit of measurement: select the value
Here as an example the entries for an empty deposit bottle:
Note: Please do not forget to publish the deposit hierarchy to the trade.
II. Hierarchy = full crates + full bottles
- GTIN (e.g. 04015000010153) for the full container: create as base item

5. GTIN (e.g. 04015000750455) for the full container: create as packaging
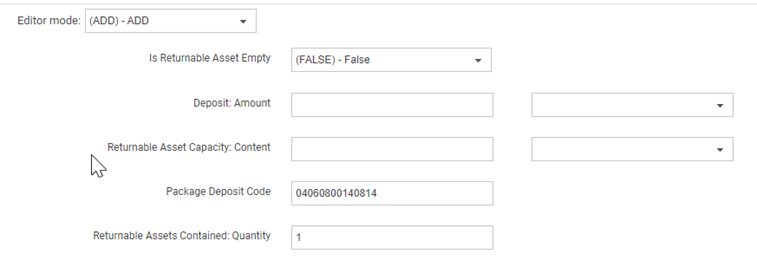
In the area “Packaging / Logistics / Price / Purchase Order / Deposit Items” under „Deposit Items“ you should enter the following configuration to mark the full product as a deposit item and to link it to the empty ones:
● Is Returnable Asset Emtpy: (FALSE) – No
● Package Deposit Code: the GTIN of the corresponding deposit item
● Returnable Assets Contained: Quantity: e.g. 1 (How often can the empties item be assigned to the full product?)
Here as an example of the information for a full bottle:
Note: Please only link full-goods items with deposit items on which there is actually a deposit. For example, if your item is a six-pack which can be packed in plastic foil and delivered in a carton, only enter the deposit GTIN of the empty can for the full can. There is of course no deposit on the carton and therefore no information in the deposit item section is given there. Therefore, please leave out the information in the box in the field “Is Returnable Asset Empty” completely and point out that the item is not a deposit item.
The following figure image illustrates the link between deposit and empty items (image available only in German):

More information on the subject of deposits can be found in our compendium in the chapter “Information on deposits”. You can find the compendium in our Download Center.
Product images and other digital assets
1. What exactly will become mandatory in February 2023?
2. Can I provide product images only through atrify's Digital Asset Management?
3. How large must be the perfect dimension and resolution of the product image?
4. Which file format is required?
5. We already provide images via atrify. Do I need to adapt the existing images to the "new" standard?
The technical verification will not be performed retroactively for already existing product images.
6. Does the product image need a clipping path?
7. Will the GS standard for file naming "File Name" be implemented?
e.g.
04000001022397_C1C1_s01_v01
(GS1 application recommendation “Produktabbildungen und Media Assets”, page 27)
8. Will there be a transition period for providing product images?
9. Is the file extension (.jpg) part of the attribute “File Name”?
10. Are there any examples of good product images?
11. Where can I find further information about the mandatority for product images?
12. Is there a sample file for correct product images?
Others issues
1. Which services does the Customer Service of atrify GmbH include?
Support
Test and production systems are part of this support. The purpose of the support is to ensure the functionality and availability of the respective subscription services, such as the use of the publishing UI and standard functions such as the creation, updating and validation of articles.
Ad hoc adaptations implemented by atrify at the customer’s request can be supported within the framework of a separately concluded support contract or service.
Technical solutions that are not implemented by atrify are not covered by this support.
When contacting atrify support, the customer must provide relevant information (such as GTIN, GLN, etc.). Below are examples of the scope of atrify’s support services, but these are not exhaustive.
Scope of support services
1. access to systems and user rights: problems with login (e.g. login not possible); changes to the account configuration
2. data validation and publication: problems when creating or editing articles and hierarchies or after their publication; exceptions, CICs, system warnings and alerts triggered by quality improvement initiatives (e.g. machine learning and DQG initiatives)
3. Excel: Problems using updated atrify Excel templates downloaded from atrify systems. Typical examples are:
- Problems with uploading and downloading: Process cannot be completed.
- Error messages after the upload: The upload is successful, but with errors.
4. system performance: unexpected system reaction when creating, deleting or editing items
5. e.g. very slow performance or interrupted sessions
6. general knowledge: General questions about system attributes, processes and best practices.
Outside the scope of support services
The following topics are not included in the scope of the support service and must be dealt with by contractual agreement between the parties as part of a fee-based service:
- Excel templates that are outdated, have not been downloaded from atrify systems or whose original format has been edited.
- Failure mass analysis: Instead, sample analysis and best practices can be provided.
- Deletion of GTINs: Deletion is only performed by the support team in cases where technical problems prevent the user from performing the deletion by himself.
- Creation of articles and correction or maintenance of data.
- Systems, XML or FMCG training courses, planned consulting sessions.
- Testing and/or setting of ad hoc scenarios based on customer requirements.
- Technical problems caused by hardware failures or systems not originating from atrify.
- Ad-hoc documentation and manuals on customer request.
- Business related questions.
Support contact details
Please visit us on the Internet at: https://www.atrify.com/en/contact/ for current contact details of the support.
2. How do I get an education or training?
Book our extended training and workshop offer anytime and from anywhere in our atrify store.
In three easy steps to your desired training:
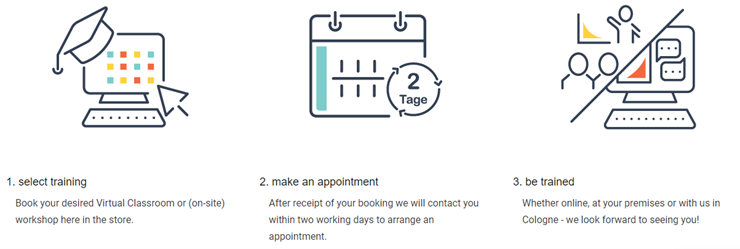
If you need an individual training which is not listed in the store, you can contact us via training-center@atrify.com
For users of the dealer portals:
- Edeka: Trainings for the Edeka portal are free of charge and are conducted by atrify; please contact us via email training-center@atrify.com for further information.
- Rewe: Trainings for the Rewe portal are free of charge and will be conducted by atrify; please contact us via email training-center@atrify.com for further information. Costs are covered by the Rewe Group.
- Metro: Trainings for the Metro Portal are free of charge and are carried out by atrify; please contact us via email training-center@atrify.com for further information. Costs are covered by Metro Group.
